(Page in progress, sorry for the uglyness)
In previous page you have my contact information, so if you have any problem with this asset let me know, I'll help you.
______________________________________
Before anything, keep this in mind: This documentation is huge, but not because the asset was complicated to implement (in fact, it's as easy as it could be), but because the asset has many things you can configure, and I detailed everything.
So, I'd recommend: Go straight to B (How to use). You'll see that just by dragging a prefab into the scene you'll be ready to go. And only come here if you don't get something. The inspector is user-friendly, you can figure out things by yourself.
______________________________________
CONTENTS OF THIS DOCUMENTATION
A. What it does (same as in asset store description page)
B. How to use (amplified)
C. Variables on the inspector for Direction Ring (in detail)
D. Events (overview, same as in asset store description page)
E. Events (details)
F. Details on Camera Shake
G. Possible interferences between Camera Shake and other scripts that rotates the camera
H. Demo Scene
______________________________________
A. THIS IS WHAT IT DOES:
1) Once you press jump, or fire (or any button or key you define), an animated ring will appear around the player, and time will slow down (slow motion effect)
2) While you're holding the button, you'll be able to select a direction with the joystick or keyboard
3) When you release the button, camera will shake and the requested action will fire (and time goes back to normal again)
You can choose what it actually does when the button/key is released:
a) A force can be applied to player it self (like a jump) on selected direction
b) A force can be applied to any other object
c) A prefab can be instantiated and then a force applies to it
d) or... nothing, you can just respond to the events risen.
______________________________________
B. HOW TO USE
It depends on you, how customized you want it.
The simplest way to use it is: Assuming you already have a game with a player and a camera...
1) Download and import the asset
2) Go to the "Prefabs" folder (outside "Demo")
3) Grab any ring prefab and drag it inside your player, as a child of it
4) If you want the camera shake feature, you have 2 options:
option a) replace your camera with the prefab called "Main Camera with Camera Shake"
option b) Follow these 3 steps:
1) Make sure your main camera has the "MainCamera" tag
2) Go to "Scripts" folder (outside "Demo")
3) Grab dg_CameraShake script and drag it into your camera.
You should be able to play.
Then, you can change the sprite of the ring, simply dragging any of the sprites (in the "Images (rings)" folder) to the 'Sprite' slot of the Sprite Renderer on the Ring object.
A more advanced way would be extend its functionality (or override some of it) by listenting (from any script) the events it fires. We'll see that below.
If the ring being visible while the game is stopped bothers you, don't disable the gameObject (it won't activate it self). Instead, disable the Sprite Renderer component.
______________________________________
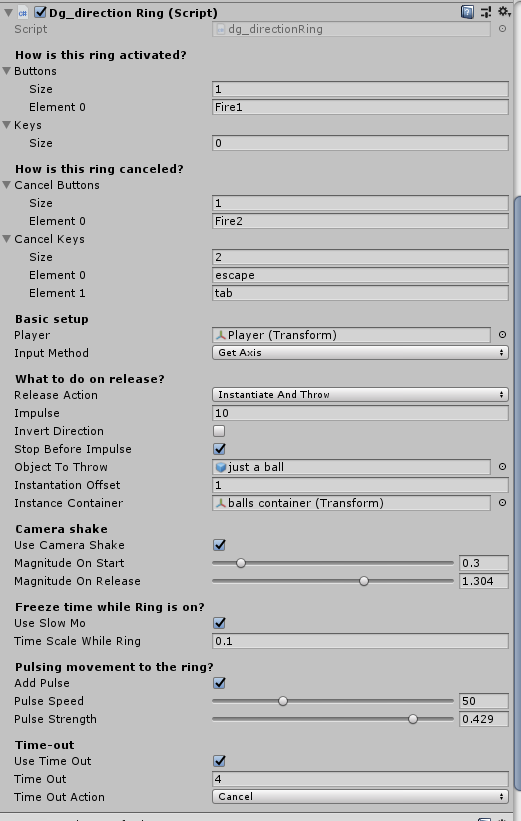
C. VARIABLES IN THE INSPECTOR
You can set many things in the inspector, as you can see in this image:
-How is this ring activated-
Buttons (List<string>)
Keys (List<string>)
Here you can set which buttons (like "Jump", "Fire1") and keys (like "space", "enter") will trigger this ring.
If you see the piece of code that reads the input, you'll understand that in "Buttons" list you're feeding the "Input.GetButton" method, and with Keys list, you're feeding GetKey method:
//is player pressing button/keys for the ring?
pressing = false;
foreach (string button in Buttons) {
    if (Input.GetButton(button)) pressing = true;
}
foreach (string key in Keys) {
    if (Input.GetKey(key)) pressing = true;
}
-How is this ring canceled-
Buttons (List<string>): Similar to above. Which buttons cancels the ring.
Keys (List<string>): Similar to above. Which keys cancels the ring.
-Basic setup-
Player (Transform): Which object is the player. Default: current object's parent, in case you placed the rings as child of the player
Input Method ("GetAxis" / "GetAxisRaw"): You can ask for either GetAxis or GetAxisRaw. Using joystick this makes no difference. but with keyboard, "GetAxis" it makes a transition between one key and the other, while with "GetAxisRaw" Ring will point immediatly to the direction of the pressed key.
-What to do on release-
Release Action ("Jump" / "ThrowObject" / "InstantiateAndThrow" / "JustFireEvent"): As said above, you can choose what to do when player releases the button/key.
Impulse (float): The impulse of the force being applied, to Player in case of Jump, to some gameObject in case of ThrowObject, to the instance of a prefab in case of InstantiateAndThrow.
Invert Direction (bool): You may want to act on the opposite direction of the arrow.
Stop Before Impulse (bool): If checked, the object will stop before the force applies. If unchecked, the force will be added to the object's current velocity.
Object to Throw (GameObject): In case of ThrowObject, the actual object to which the force is applied. In case of "InstantiateAndThrow", the Prefab to be instantiated.
Instantiation Offset (float): In case of "InstantiateAndThrow", when the Prefab instantiates, you probably don't want it in the players position, but a little more far. This is how far from the Player the instance will be positioned (in the selected direction)
Instance Container (Transform): In case of "InstantiateAndThrow", this indicates the parent of all instances created.
-Camera Shake-
Use Camera Shake: (bool). Whether or not you want this feature. If true, you'll have to: a) Tag your camera as
"MainCamera", and b) Add the script "dg_cameraShake" to it.
Magnitude on Start (float): How strong the camera shake will be when the ring starts. 0 means "no shake". For reference, I consider .3 is a little shake, .8 a medium one, and 1.5 a big one.
Magnitude on Release (float): How strong the camera shake will be when the ring fires.
-Freeze time while Ring is on-
Use slow mo (bool): Wheather you want this feature or not. As said above, you can ask for time to slow down while the ring is on.
Time scale while Ring (float): How much "slow motion" effect. 1 means no change. 0.5 means 50% speed. A value between 0.05 and 0.15 is recomended.
-Pulsing movement to the ring-
Add Pulse (bool): Wheather you want the ring to pulsate or not.
Pulse Speed (float): How slow/fast the pulse.
Pulse Strength (float): How much the scale increases and decreases. You have to experiment with these values.
-Time out-
Use Time Out (bool): Wheather you want this feature or not. It consist on giving the player a maximum time to decide.
Time Out (float): How many seconds is the time out.
Time Out Action ("Cancel" / "Release Action"): Here you can choose between:
- "Cancel": When time is out, it's equivalent to the player cancelling the ring (nothing happens, the ring just stops)
- "Release Action": Equivalent to the player releasing the button or key when time is out.
______________________________________
D. EVENTS (overview)
Events will be risen whenever:
a) a ring starts
b) a ring cancels
c) a ring fires
Obviously you can ignore them and just use the jump this asset offers...
...Or, you can very easily suscribe and listen to these events an respond however you want in your own scripts, without having to touch the asset's scripts. These events provides useful information. For example, "ring_fired" event provides you:
- which ring is rising the event, useful if you have several of them
- which was the release action of that ring ("Jump", "InstantiateAndThrow", etc)
- the chosen direction, so you can act with it
- the new instance created from your prefab, so you can apply forces or effects to it
Suscribing to events it's only 1 line of code where you say what method (of your own) to call when an event occurs. It's all detailed below.
______________________________________
E. EVENTS (Details)
How to suscribe to events.
In the script "Demo/Scripts/ringEventsListener.cs" you have examples on how to suscribe to events and add functionality.
Basically, in any script you want, first make your own method, that will be automatically called later. For example:
void myMethod_ringStarted(Transform tr) {
    Debug.Log(tr.name + " -> Ring started", tr);
    //add sound
	//instantiate particles at tr.position
}
And then, in the Start method add this line:
ringEvents.ring_started += myMethod_ringStarted;
(without parenthesis! You're not executing the method yet) Here you're saying, whenever the event fires, execute this. Your method will be called with only 1 parameter: the Ring that started.
The "cancel" event is very similar, recieving only 1 parameter: the Ring that was cancelled.
void ringCancelled(Transform tr) {
     Debug.Log(tr.name + " -> Ring cancelled", tr);
}
And the "fired" method has more information:
void ringFired(Transform tr, string actionName, Vector2 dir, Transform thrownObj) {
}
where:
the 1st parameter (Transform) is the Ring that was fired (i.e, released the button)
the 2nd parameter (string) is the "release action" of the ring, as a string ("Jump" / "ThrowObject" / "InstantiateAndThrow" / "JustFireEvent")
the 3rd parameter (Vector2) is the selected direction as a Vector2.
the 4th parameter (Transform) is the object to which the force has applied. In the case of "Jump", the player itself. In the case of "ThrowObject", the same object you passed in "objectToThrow". In the case of "InstantiateAndThrow", the new instance of the Prefab. In the case of "JustFireEvent", null.
__________________________________________
F. VARIABLES IN dg_cameraShake:
- Axes to shake:
- Shake_x (bool): Whether the X axis of camera should be affected by the shake
- Shake_y (bool): Whether the Y axis of camera should be affected by the shake
- Shake_z (bool): Whether the Z axis of camera should be affected by the shake
- Duration: This number represents how much (/100) the magnitude of the shake will be multiplied by, in each frame. For example, Duration 99 means that each frame the magnitude will be multiplied by .99, producing a long shake. Duration 80 means that each frame the magnitude will be multiplied by 0.8, producing a short shake.
- Managed Externally (bool): This is not relevant to the usage of "Direction Ring".
If true, the script won't apply any rotation by itself. In other words, the Update() method won't call the public ApplyShake() method, so other script can execute it when it's convenient. This is useful when other script (besides cameraShake) rotates the camera, to avoid both scripts attempting to rotate the camera on the same frames. In this case, the other script can call the public ApplyShake() method right after his own rotations are made, before rendering, so the second rotations (the shake) will be applied on top to first ones, resulting on very smooth shakes.
__________________________________________
G. CAMERA SHAKE + OTHER ROTATION SCRIPT
Are you planning to use Camera Shake but using some other script that rotates the camera, like a character controller?
Then you should follow this 3 steps:
1. Go to that other script
2. Add this line in the declaration area:
dg_cameraShake shakeScript;
3. On the Start() method, add this line:
shakeScript = Camera.main.GetComponent<dg_cameraShake>();
4. Search where the rotation is made, and AFTER that, add this line:
shakeScript.ApplyShake();
__________________________________________
H. DEMO SCENE.
This asset contains a demo scene that showcases its possibilities.
To run it, just go to /Demo/Scenes folder, and double-click the scene inside and press play.
__________________________________________
If you need my assistance regarding this asset, feel free to contact me. Just be patient if I don't answer right away, give me 24hs before feeling abandoned :)
I'll answer every question you have, before and after buying the asset.
Contact info in previous page.
Damián González