ABOUT & DEMO
BASIC vs FULL
IMPLEMENTATION
a. From demo scene
b. From your own scene
c. From scratch
HOW IT WORKS
PLAYER OPTIONS
FILTERS
ADVANCED OPT.
a. Elastic Plane
b. Clipping alignment
3RD PERSON CONTROLLER
CLONES
NESTED PORTALS
SURFACE PORTALS
MULTI-GRAVITY
OPTIMIZATION
RECURSIVE RENDERING
SWITCHES AND LIGHTS
a. Implementation
b. Initial state
c. Timer
WORKFLOWS (RUNTIME / DEPLOYED)
RAYCAST TELEPORTING
TROUBLESHOOTING
a. Doesn't teleport
b. Materials
c. Flickering
d. Missing objects
e. Smooth camera
CONTACT
_______
Back
Thank you for purchasing this asset!
Don't forget to leave an honest review in the Asset Store.
Please note VR is not supported
INTRO & DEMO
This is the documentation for the newest version of "Fluid Seamless Portals". If you're looking for docs for version 1.3, please go here.
Links to the Unity Asset Store: Basic version · Full version
By the way, you can download a build of a demo scene to test it yourself.
If you have any problems, you can go directly to the troubleshooting section.
VERSIONS (BASIC vs FULL)
There is so much that can be done with portals that I have decided to let my imagination run wild as a developer and experiment with new functions, but maintaining a cheaper version for those who want the basic functionalities.
 Full version video:
Please note VR is not supported
Basic version video:
IMPLEMENTATION
Implementing this asset is very simple.
 You can open the first scene, called "General Demo", and simply press Play. Just like that, you should be able to explore everything the asset offers. And of course, you can build your game around this scene.
 and drag any of the prefabs into your scene.
Inside the prefab you will see 2 individual portals (A and B). You can place them wherever you want and rotate them however you want.
(But be careful to manipulate these two objects ("portal A" and "portal B") and not their children. This could cause unwanted effects)
...And that's it!
and drag any of the prefabs into your scene.
Inside the prefab you will see 2 individual portals (A and B). You can place them wherever you want and rotate them however you want.
(But be careful to manipulate these two objects ("portal A" and "portal B") and not their children. This could cause unwanted effects)
...And that's it!
1 If you don't have one, create a new Unity project
2 Download and import the asset
3 Create 2 different places, even if they are just floors: Create 2 cubes, with a scale like [20, 1, 20], and make them different in some way (otherwise you won't notice if you you teleported) as a different color, or add some object.
4 Now drag a set of portals into your scene (see above) and place one in each location
5 Drag a player from Prefab/Player, and place it in one of the rooms
That's all. Press play and have fun!
a. From the demo scene
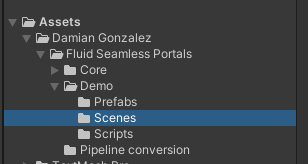
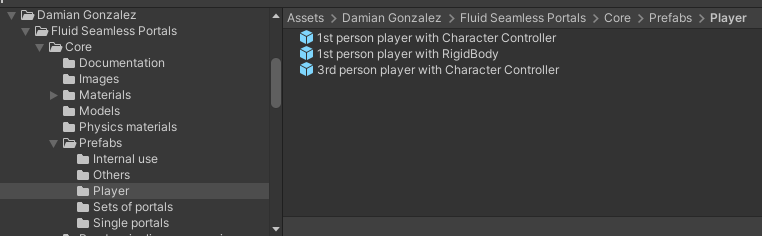
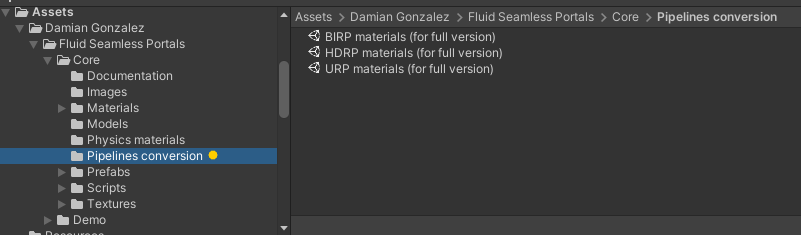
After purchasing and importing the asset, you will find this folder in the Project window:
You can open the first scene, called "General Demo", and simply press Play. Just like that, you should be able to explore everything the asset offers. And of course, you can build your game around this scene.
b. From your own scene
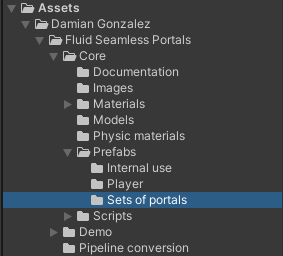
Or, of course, if you already have a scene, you can add the portals to it. This is very easy, just go to the prefabs folder:
and drag any of the prefabs into your scene.
Inside the prefab you will see 2 individual portals (A and B). You can place them wherever you want and rotate them however you want.
(But be careful to manipulate these two objects ("portal A" and "portal B") and not their children. This could cause unwanted effects)
...And that's it!
c. From scratch
If you want to build it from scratch, it's easy too. Follow these steps:HOW IT WORKS
Obviously this is not magic but a trick well done.
In Unity (and in reality) things are in one place or another.
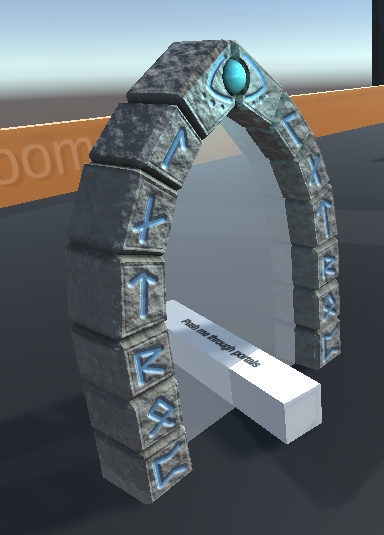
The trick is that there is a plane right inside each portal:
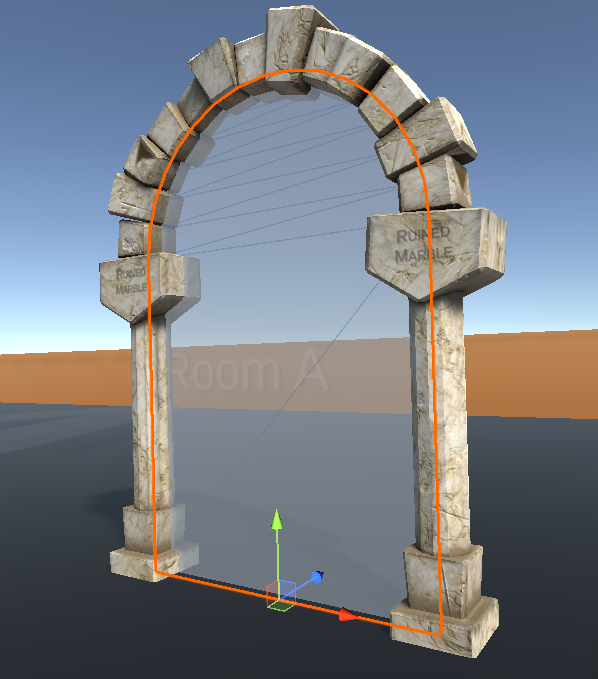 and this plane projects what a camera around the other portal is seeing:
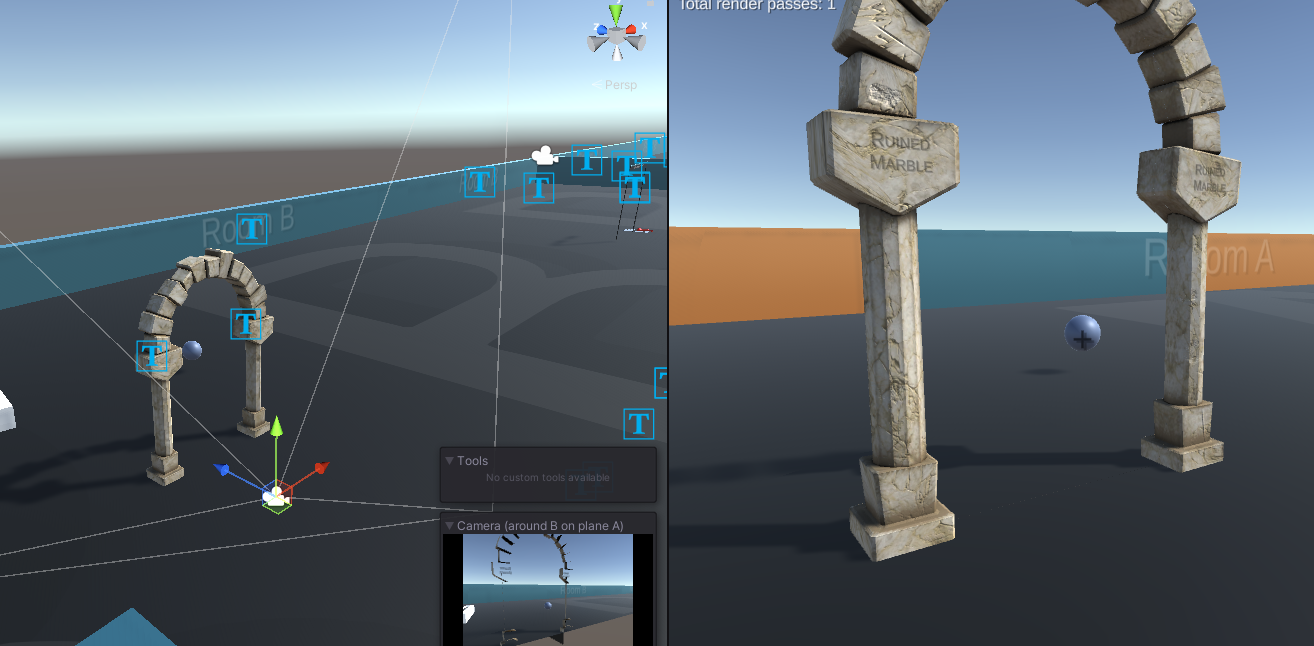 This gives the illusion that behind the arch there is another place, which is not really there. Then, when the camera is close enough to the plane, the player teleports to the other portal.
It's much more complex than this, actually, but that's the basic way portals work. When we later talk about "plane" and "camera", we are referring to that basic behavior described.
This gives the illusion that behind the arch there is another place, which is not really there. Then, when the camera is close enough to the plane, the player teleports to the other portal.
It's much more complex than this, actually, but that's the basic way portals work. When we later talk about "plane" and "camera", we are referring to that basic behavior described.
and this plane projects what a camera around the other portal is seeing:
This gives the illusion that behind the arch there is another place, which is not really there. Then, when the camera is close enough to the plane, the player teleports to the other portal.
It's much more complex than this, actually, but that's the basic way portals work. When we later talk about "plane" and "camera", we are referring to that basic behavior described.
PLAYER OPTIONS
This asset contains two players: One with rigidbody and another with character controller. In the full version, there is also a 3rd person player.
 If you use one of these players, you will not need to configure anything in the "player" section
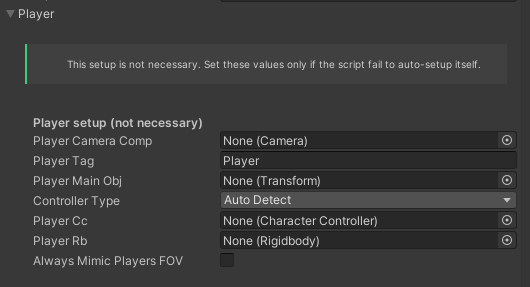 When you press "play", the script will do its best to auto-detect these values. Try it, press "play" and see what values you see in the inspector:
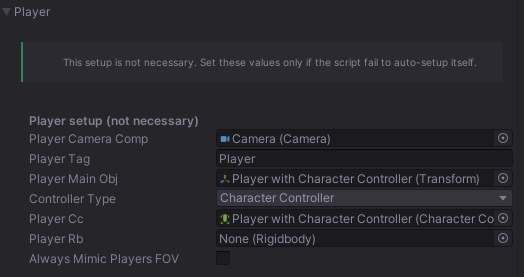 If there is something wrong, then you will have to press Stop and drag your player and its camera into those variables.
The "Always Mimic Players FOV" option is useful if your player does a zoom effect, changing the Field of View of their camera. If you check that option, the portal cameras will do the same.
If there is something wrong, then you will have to press Stop and drag your player and its camera into those variables.
The "Always Mimic Players FOV" option is useful if your player does a zoom effect, changing the Field of View of their camera. If you check that option, the portal cameras will do the same.
If you use one of these players, you will not need to configure anything in the "player" section
When you press "play", the script will do its best to auto-detect these values. Try it, press "play" and see what values you see in the inspector:
If there is something wrong, then you will have to press Stop and drag your player and its camera into those variables.
The "Always Mimic Players FOV" option is useful if your player does a zoom effect, changing the Field of View of their camera. If you check that option, the portal cameras will do the same.
FILTERS
One of the most basic settings is: Besides the player, what other objects can teleport?
If you choose "Everything", everything can cross.
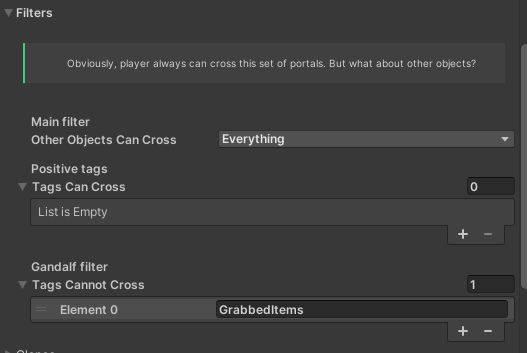 If you choose "Only Specific Tags", only the player and the objects that have the tags you declare below in "Positive tags" can cross (be careful with upper and lower case letters, spaces, etc.; they have to be exactly the same).
If you choose "Nothing Only Player", only the player will be able to teleport and the other objects will just go through the plane without teleporting.
Then, with any of the options you chose, you can set negative filters to "Tags [that] Cannot Cross." Write there the tags of those objects should never cross, regardless of what you have established above.
In the example in the image, everything can cross except the items that the player is holding.
If you choose "Only Specific Tags", only the player and the objects that have the tags you declare below in "Positive tags" can cross (be careful with upper and lower case letters, spaces, etc.; they have to be exactly the same).
If you choose "Nothing Only Player", only the player will be able to teleport and the other objects will just go through the plane without teleporting.
Then, with any of the options you chose, you can set negative filters to "Tags [that] Cannot Cross." Write there the tags of those objects should never cross, regardless of what you have established above.
In the example in the image, everything can cross except the items that the player is holding.
ELASTIC PLANE AND ADVANCED OPTIONS
The above description of how the portals work (a camera renders onto a plane and then the player teleports) would be sufficient if the portals were aligned and the player always crossed facing forward. But it's not always like this. That's why I added some features.
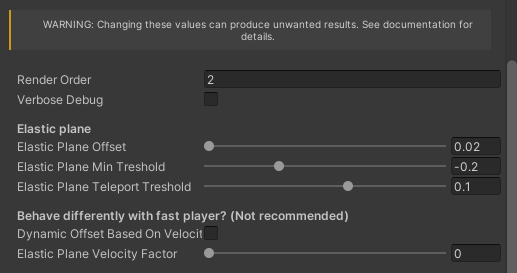 "Elastic Plane Offset" determines the minimum distance between the player and the plane. This value has to be equal to or slightly greater than the "near clipping plane" of the player's camera. This value will be automatically adjusted when entering play mode if it is lower than it should be. If you see a flicker when crossing, you can raise this value a little.
If your portal is wide, you can leave a larger value without problem. But in the case of the "ultra thin" portal, if this value is large you could see the plane going off the thin portal.
"Elastic Plane Min[imum] Treshold" determines the distance between player and portal at which the plane starts to move.
"Elastic Plane Teleport Treshold" determines the distance between player and portal at which the player teleports. It must be greater than the previous value.
"Elastic Plane Offset" determines the minimum distance between the player and the plane. This value has to be equal to or slightly greater than the "near clipping plane" of the player's camera. This value will be automatically adjusted when entering play mode if it is lower than it should be. If you see a flicker when crossing, you can raise this value a little.
If your portal is wide, you can leave a larger value without problem. But in the case of the "ultra thin" portal, if this value is large you could see the plane going off the thin portal.
"Elastic Plane Min[imum] Treshold" determines the distance between player and portal at which the plane starts to move.
"Elastic Plane Teleport Treshold" determines the distance between player and portal at which the player teleports. It must be greater than the previous value.
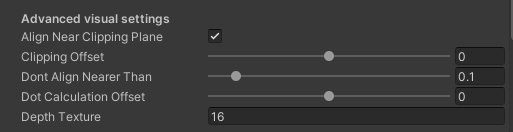 Change the "Clipping offset" value if you see a gap in the center of the portal.
The "Depth texture" value is the depth of the render textures that are generated when you press play. Normally, in the built-in pipeline you can use any small value (1, 2, 4) but in URP or HDRP, some objects may look bad when you are too close to the plane (just below the portal). If this occurs, try a higher value such as 32 or 64.
Change the "Clipping offset" value if you see a gap in the center of the portal.
The "Depth texture" value is the depth of the render textures that are generated when you press play. Normally, in the built-in pipeline you can use any small value (1, 2, 4) but in URP or HDRP, some objects may look bad when you are too close to the plane (just below the portal). If this occurs, try a higher value such as 32 or 64.
a. Elastic plane
A common problem is that the player can cross the portal sideways (looking at the pillars of the portal), causing a flicker when crossing, or that when positioned just below the portal, the plane disappears because the camera is too close. The solution is, instead of the plane being static, using a dynamic plane, that moves to keep a distance from the player as the player approaches, so that the plane is always "a little further away" and can be visible until is safe to teleport.
"Elastic Plane Offset" determines the minimum distance between the player and the plane. This value has to be equal to or slightly greater than the "near clipping plane" of the player's camera. This value will be automatically adjusted when entering play mode if it is lower than it should be. If you see a flicker when crossing, you can raise this value a little.
If your portal is wide, you can leave a larger value without problem. But in the case of the "ultra thin" portal, if this value is large you could see the plane going off the thin portal.
"Elastic Plane Min[imum] Treshold" determines the distance between player and portal at which the plane starts to move.
"Elastic Plane Teleport Treshold" determines the distance between player and portal at which the player teleports. It must be greater than the previous value.
b. Near Clipping Plane Alignment
Another problem usually occurs when the player looks at the portal from a very different angle than the portal. The portal camera (like every camera) has a "close plane" that determines how close it should render, and that plane is by default aligned with the camera itself. Since version 1.4, the "align near clipping plane" function ensures that the camera plane is aligned with the portal, so that no unwanted cuts are seen.
Change the "Clipping offset" value if you see a gap in the center of the portal.
The "Depth texture" value is the depth of the render textures that are generated when you press play. Normally, in the built-in pipeline you can use any small value (1, 2, 4) but in URP or HDRP, some objects may look bad when you are too close to the plane (just below the portal). If this occurs, try a higher value such as 32 or 64.
THIRD PERSON CONTROLLER
Following what we saw above, "seamless" teleportation occurs when the camera is close enough to the portal. A problem that 3rd person controllers have is that the camera is behind the player, therefore, when the camera reaches the plane, the character has already passed through the portal.
That is why this asset (since version 1.4) incorporates a mechanic that makes the camera, as it approaches the portal, move closer to the player, so that when teleporting, the camera behaves as a 1st person controller, to then slowly return to its normal position in 3rd person.
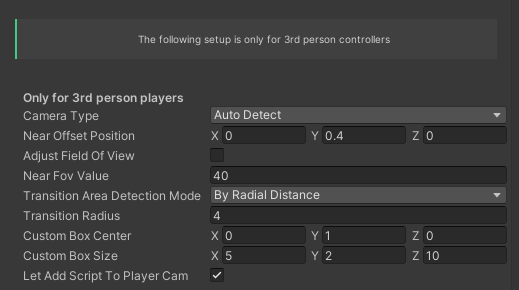 This is all achieved automatically when "Camera Type" is set to "Auto Detect" or "Third Person."
"Near Offset Position" is the position relative to the player at the time of passing. If you see a flicker when telporting, it's possible that the "z" value needs to be a little lesser (for example -0.5). If the camera goes through the player, you should raise the "y" value.
Additionally, you can change the "field of view" of the camera when crossing, generating a zoom effect. To do this, activate the "Adjust Field of View" option and set a number lower than the normal "Field of view" of your camera.
There are two ways ("Transition Area Detection Mode") you can calculate how near teleporting the player is. The simplest way is setting "By Radial Distance" and giving it a radius value.
Another method is "By Custom Box", where you set the dimensions.
Note that when you change modes and change radius or box values, you will see a gizmo representing the transition area in the yellow, so you can see the values while you're changing them. A small area or radius will cause a more abrupt change. A large area or radius will cause a more gradual change.
Finally, by enabling the "Let Add Script To Player Camera" check, you give permission for a script to be added to the camera to make these position and FOV changes possible. You can also add it yourself, it is the "Third Person Offset And FOV" script, and it goes on the camera object.
Finally, keep in mind that if you use a controller other than the one that comes with the asset, the position of the camera may be controlled by another script, which will cause a fight between two scripts for positioning the camera.
This is all achieved automatically when "Camera Type" is set to "Auto Detect" or "Third Person."
"Near Offset Position" is the position relative to the player at the time of passing. If you see a flicker when telporting, it's possible that the "z" value needs to be a little lesser (for example -0.5). If the camera goes through the player, you should raise the "y" value.
Additionally, you can change the "field of view" of the camera when crossing, generating a zoom effect. To do this, activate the "Adjust Field of View" option and set a number lower than the normal "Field of view" of your camera.
There are two ways ("Transition Area Detection Mode") you can calculate how near teleporting the player is. The simplest way is setting "By Radial Distance" and giving it a radius value.
Another method is "By Custom Box", where you set the dimensions.
Note that when you change modes and change radius or box values, you will see a gizmo representing the transition area in the yellow, so you can see the values while you're changing them. A small area or radius will cause a more abrupt change. A large area or radius will cause a more gradual change.
Finally, by enabling the "Let Add Script To Player Camera" check, you give permission for a script to be added to the camera to make these position and FOV changes possible. You can also add it yourself, it is the "Third Person Offset And FOV" script, and it goes on the camera object.
Finally, keep in mind that if you use a controller other than the one that comes with the asset, the position of the camera may be controlled by another script, which will cause a fight between two scripts for positioning the camera.
CLONES
Imagine an object that is passing through the portal, as in the image:
 If you press play without using the clone system, you will see something like this:
 The clone system ensures that, although the object is actually in one place or the other, it is visually in both places at the same time, creating a clone while it is near the portal and updating it when it moves.
 When the player teleports, the clones change sides, so that the physics of the object (if it had a rigidbody) always remain on the player's side.
If you see an object (or the player itself) flash or disappear for a moment while crossing, activate this option:
When the player teleports, the clones change sides, so that the physics of the object (if it had a rigidbody) always remain on the player's side.
If you see an object (or the player itself) flash or disappear for a moment while crossing, activate this option:

If you press play without using the clone system, you will see something like this:
The clone system ensures that, although the object is actually in one place or the other, it is visually in both places at the same time, creating a clone while it is near the portal and updating it when it moves.
When the player teleports, the clones change sides, so that the physics of the object (if it had a rigidbody) always remain on the player's side.
If you see an object (or the player itself) flash or disappear for a moment while crossing, activate this option:
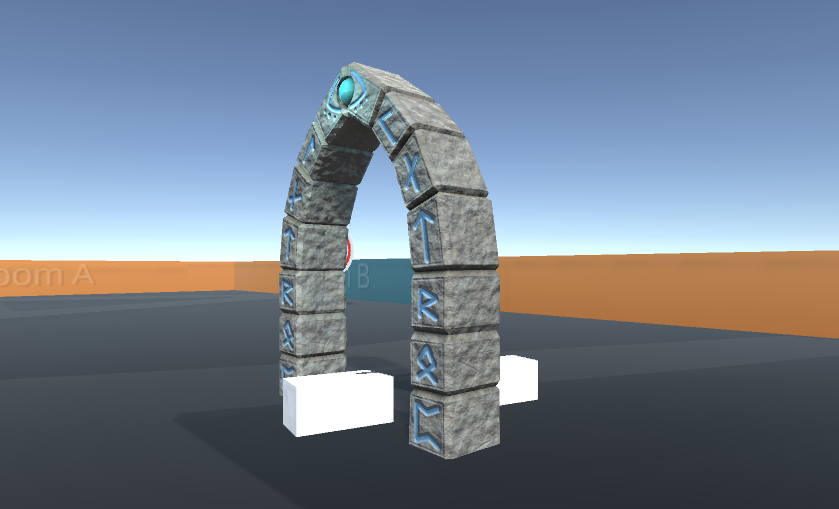
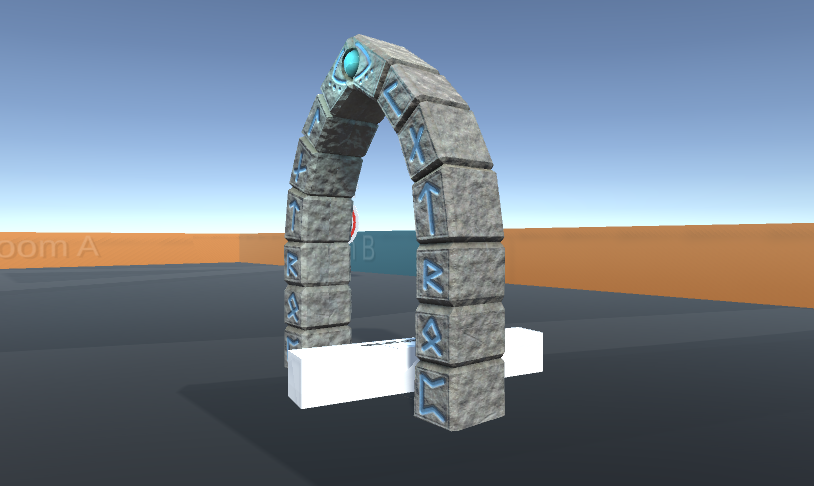
NESTED PORTALS
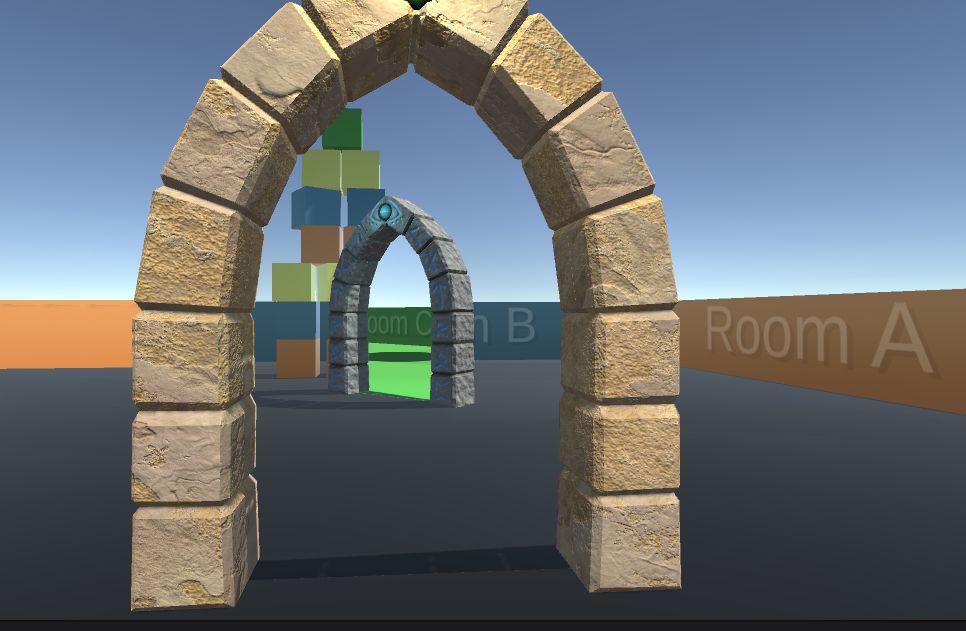
There is a problem when you see a portal through another portal.
If that other portal is from the same set (portal A and B from the same group are facing each other), then the solution is to use recursive rendering, not this option. This option is for when the portals are from different groups. For example:
 Let's see the hierarchy to understand the problem:
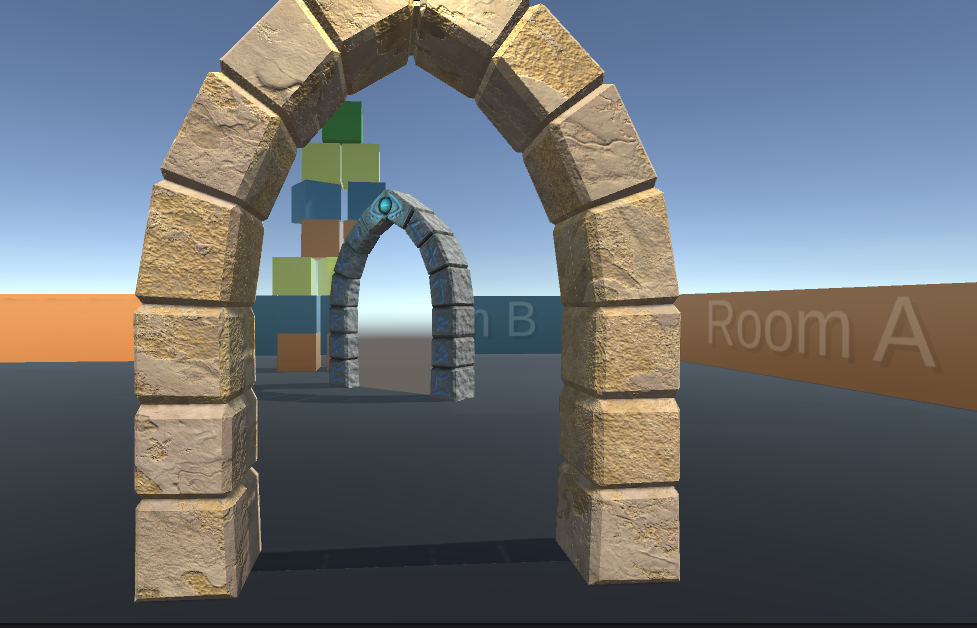
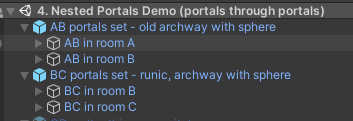 In the example, group AB lets us see room B from room A. But in room B we have the group BC. We should be able to see world C, but we can't.
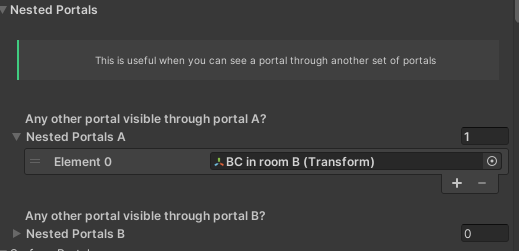
So, we don't have to do anything in the configuration of group BC, but in group AB. We have to go to group AB and declare that through portal A we want to see the inside of portal B of BC:
In the example, group AB lets us see room B from room A. But in room B we have the group BC. We should be able to see world C, but we can't.
So, we don't have to do anything in the configuration of group BC, but in group AB. We have to go to group AB and declare that through portal A we want to see the inside of portal B of BC:
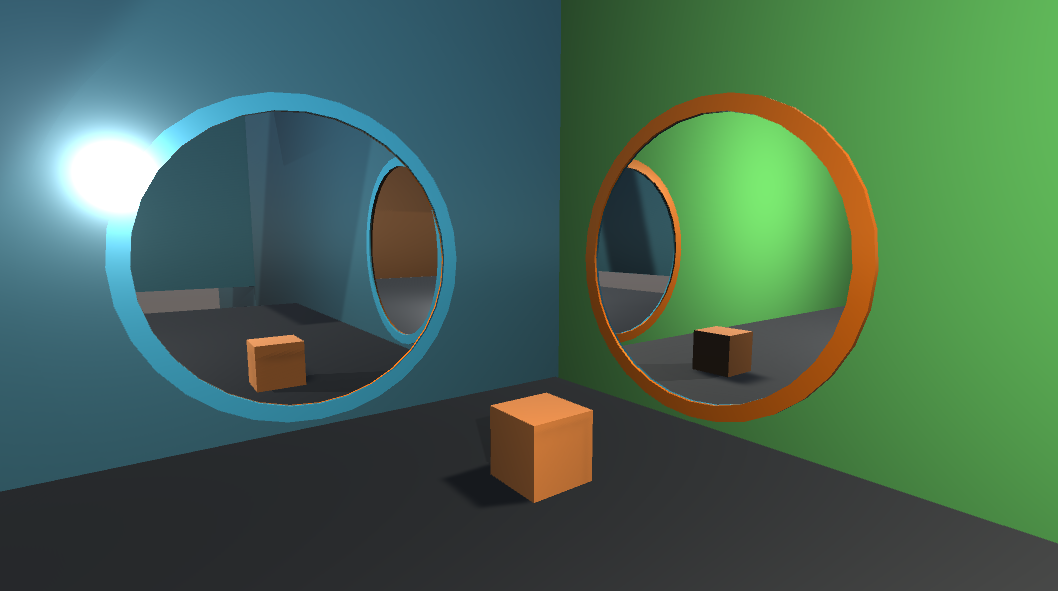
 Then the result will be this:
 It is worth mentioning that this functionality generates a small lag, like a woobly effect, because the portal will always be 1 frame late. The lower the FPS, the more noticeable this effect will be (1 frame in 30 FPS is worse than 1 frame in 500 FPS). And if you have several nested portals one inside another, the woobly effects is more apparent (inner rendering will be 2 or more frames late).
Also, another limitation is that you cannot directly watch a portal that is being show as nested by other portal (a portal is either nested or not). So, my tip is: Whenever you can, try to face portal away from the others (try to avoid nester portals).
It is worth mentioning that this functionality generates a small lag, like a woobly effect, because the portal will always be 1 frame late. The lower the FPS, the more noticeable this effect will be (1 frame in 30 FPS is worse than 1 frame in 500 FPS). And if you have several nested portals one inside another, the woobly effects is more apparent (inner rendering will be 2 or more frames late).
Also, another limitation is that you cannot directly watch a portal that is being show as nested by other portal (a portal is either nested or not). So, my tip is: Whenever you can, try to face portal away from the others (try to avoid nester portals).
Let's see the hierarchy to understand the problem:
In the example, group AB lets us see room B from room A. But in room B we have the group BC. We should be able to see world C, but we can't.
So, we don't have to do anything in the configuration of group BC, but in group AB. We have to go to group AB and declare that through portal A we want to see the inside of portal B of BC:
Then the result will be this:
It is worth mentioning that this functionality generates a small lag, like a woobly effect, because the portal will always be 1 frame late. The lower the FPS, the more noticeable this effect will be (1 frame in 30 FPS is worse than 1 frame in 500 FPS). And if you have several nested portals one inside another, the woobly effects is more apparent (inner rendering will be 2 or more frames late).
Also, another limitation is that you cannot directly watch a portal that is being show as nested by other portal (a portal is either nested or not). So, my tip is: Whenever you can, try to face portal away from the others (try to avoid nester portals).
SURFACE PORTALS
If you've come here, you probably know the video game Portal 1 or 2.
This feature allows you to do something similar: to dynamically reposition portals on surfaces like walls and ceilings, although it needs to be said that this is not a well polished system, and there are some considerations to take into account regarding the player and the world.
 Also, keep in mind that, in version 2.0, portals in floors won't work. They will be placed, but the player is not going to be teleported, because the camera is higher than the body, and the body collisions will prevent the camera to reaching the actual plane of the portal. This will be addressed in future versions, but so far, be noticed that this is a limitation.
There are two problems to take into account with this type of portals:
First problem: The walls have colliders, and these can prevent the player from passing. That is, the character has its own collisions, its own "thickness", and that thickness can cause the character to collide with the wall before the camera is close enough to the shot to teleport:
Also, keep in mind that, in version 2.0, portals in floors won't work. They will be placed, but the player is not going to be teleported, because the camera is higher than the body, and the body collisions will prevent the camera to reaching the actual plane of the portal. This will be addressed in future versions, but so far, be noticed that this is a limitation.
There are two problems to take into account with this type of portals:
First problem: The walls have colliders, and these can prevent the player from passing. That is, the character has its own collisions, its own "thickness", and that thickness can cause the character to collide with the wall before the camera is close enough to the shot to teleport:
 For this, I recommend 2 options:
Option 1 (ideal for invisible characters): Make the character collisions very thin, for example lowering the character controller's radius to 0.02 or less, and a "skin width" of 0.1. This way, it is not necessary to deal with wall collisions, because the character will have room to teleport, the camera will reach the plane before the player touches the wall behind. The downside to this is that you'll have to modify your character, and if the character is visible and thick, parts of its body may clip through other walls.
For this, I recommend 2 options:
Option 1 (ideal for invisible characters): Make the character collisions very thin, for example lowering the character controller's radius to 0.02 or less, and a "skin width" of 0.1. This way, it is not necessary to deal with wall collisions, because the character will have room to teleport, the camera will reach the plane before the player touches the wall behind. The downside to this is that you'll have to modify your character, and if the character is visible and thick, parts of its body may clip through other walls.
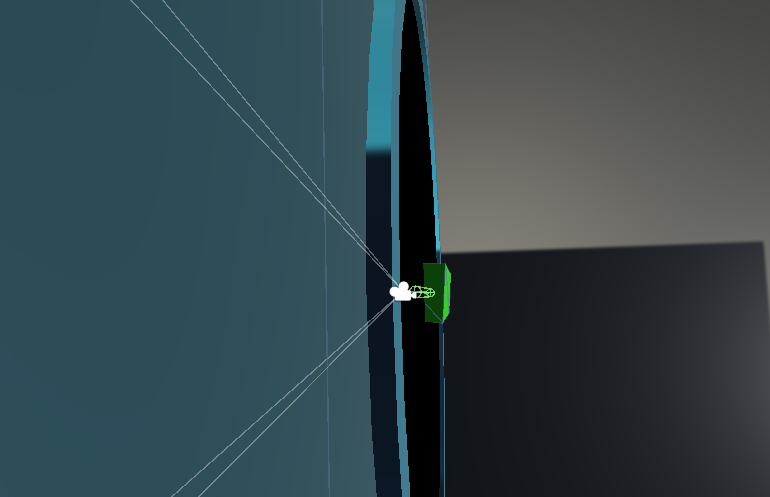 (In the image, now the camera is ready to teleport the character and he has not yet collided with the wall)
Option 2: Another option, more world-friendly is to leave the character as it is and use the "Colliders Management" options, which will disable the colliders near the portal while the character is nearby, and restore them when it has teleported or moved away.
(In the image, now the camera is ready to teleport the character and he has not yet collided with the wall)
Option 2: Another option, more world-friendly is to leave the character as it is and use the "Colliders Management" options, which will disable the colliders near the portal while the character is nearby, and restore them when it has teleported or moved away.
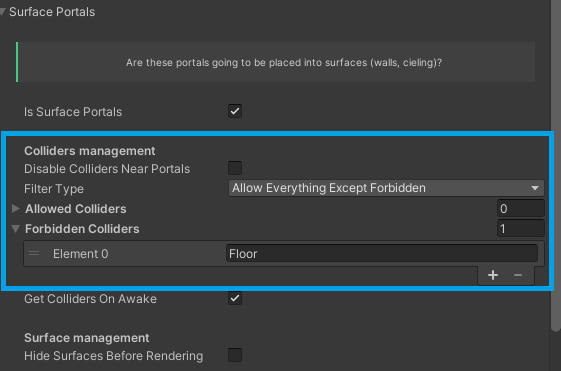 1) activate the "Disable Colliders Near Portals" option
2) in "Filter Type", choose either "Allow Everything Except Forbidden" (as in the example, where every colliders can be disabled except the ground's) or "Allow Only Explicit" (only those that you explicitly declare in "Allowed Colliders" will be managed).
Second problem: The wall rendering obstructs the view of the portal. This happens because, being right under the portal, the portal camera has to be placed too close to the wall.
For this, I recommend 2 options:
Option 1 (ideal but requires adapting the environment): Make the walls only visible on the player's side, and not on the side from which the camera wants to film. To do this, walls that are cubes must be "planes" and walls that are 3D models must not have faces on the other side. In HDRP, the "both sides" option of the renderer must be disabled.
1) activate the "Disable Colliders Near Portals" option
2) in "Filter Type", choose either "Allow Everything Except Forbidden" (as in the example, where every colliders can be disabled except the ground's) or "Allow Only Explicit" (only those that you explicitly declare in "Allowed Colliders" will be managed).
Second problem: The wall rendering obstructs the view of the portal. This happens because, being right under the portal, the portal camera has to be placed too close to the wall.
For this, I recommend 2 options:
Option 1 (ideal but requires adapting the environment): Make the walls only visible on the player's side, and not on the side from which the camera wants to film. To do this, walls that are cubes must be "planes" and walls that are 3D models must not have faces on the other side. In HDRP, the "both sides" option of the renderer must be disabled.
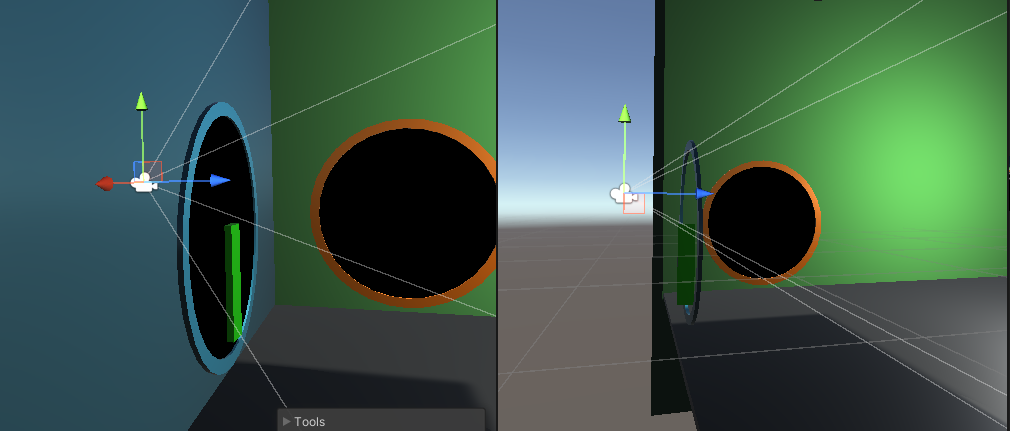 The image shows how the wall (now a plane) is visible only from the player's side and doesn't obstruct the camera rendering.
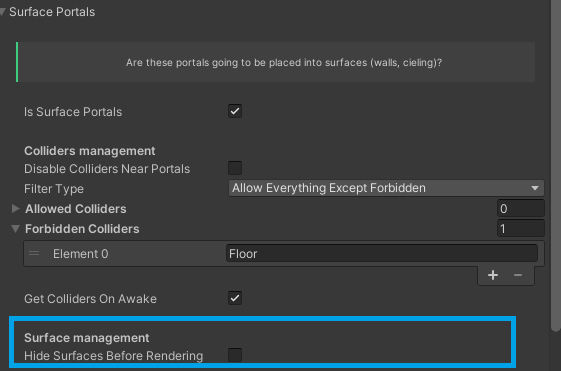
Option 2 (a little messier but you can keep your cubes or models alone): Another option is to use the "Hide Surfaces Before Rendering" option, which temporarily hides the wall so they don't obstruct the portal camera and then restore it. Keep in mind that the lights will pass through that wall, so if you're going to do it, it is recommended to place a "shadow caster" (a false wall in the same place) with the "Shadows Only" option in the "Cast Shadows" variable of the Renderer.
The image shows how the wall (now a plane) is visible only from the player's side and doesn't obstruct the camera rendering.
Option 2 (a little messier but you can keep your cubes or models alone): Another option is to use the "Hide Surfaces Before Rendering" option, which temporarily hides the wall so they don't obstruct the portal camera and then restore it. Keep in mind that the lights will pass through that wall, so if you're going to do it, it is recommended to place a "shadow caster" (a false wall in the same place) with the "Shadows Only" option in the "Cast Shadows" variable of the Renderer.
 Note: In the example images, the surface portals feature is combined with recursive rendering.
Also, keep in mind that, in version 2.0, portals in floors won't work. They will be placed, but the player is not going to be teleported, because the camera is higher than the body, and the body collisions will prevent the camera to reaching the actual plane of the portal. This will be addressed in future versions, but so far, be noticed that this is a limitation.
There are two problems to take into account with this type of portals:
First problem: The walls have colliders, and these can prevent the player from passing. That is, the character has its own collisions, its own "thickness", and that thickness can cause the character to collide with the wall before the camera is close enough to the shot to teleport:
For this, I recommend 2 options:
Option 1 (ideal for invisible characters): Make the character collisions very thin, for example lowering the character controller's radius to 0.02 or less, and a "skin width" of 0.1. This way, it is not necessary to deal with wall collisions, because the character will have room to teleport, the camera will reach the plane before the player touches the wall behind. The downside to this is that you'll have to modify your character, and if the character is visible and thick, parts of its body may clip through other walls.
(In the image, now the camera is ready to teleport the character and he has not yet collided with the wall)
Option 2: Another option, more world-friendly is to leave the character as it is and use the "Colliders Management" options, which will disable the colliders near the portal while the character is nearby, and restore them when it has teleported or moved away.
1) activate the "Disable Colliders Near Portals" option
2) in "Filter Type", choose either "Allow Everything Except Forbidden" (as in the example, where every colliders can be disabled except the ground's) or "Allow Only Explicit" (only those that you explicitly declare in "Allowed Colliders" will be managed).
Second problem: The wall rendering obstructs the view of the portal. This happens because, being right under the portal, the portal camera has to be placed too close to the wall.
For this, I recommend 2 options:
Option 1 (ideal but requires adapting the environment): Make the walls only visible on the player's side, and not on the side from which the camera wants to film. To do this, walls that are cubes must be "planes" and walls that are 3D models must not have faces on the other side. In HDRP, the "both sides" option of the renderer must be disabled.
The image shows how the wall (now a plane) is visible only from the player's side and doesn't obstruct the camera rendering.
Option 2 (a little messier but you can keep your cubes or models alone): Another option is to use the "Hide Surfaces Before Rendering" option, which temporarily hides the wall so they don't obstruct the portal camera and then restore it. Keep in mind that the lights will pass through that wall, so if you're going to do it, it is recommended to place a "shadow caster" (a false wall in the same place) with the "Shadows Only" option in the "Cast Shadows" variable of the Renderer.
Note: In the example images, the surface portals feature is combined with recursive rendering.
MULTI-GRAVITY
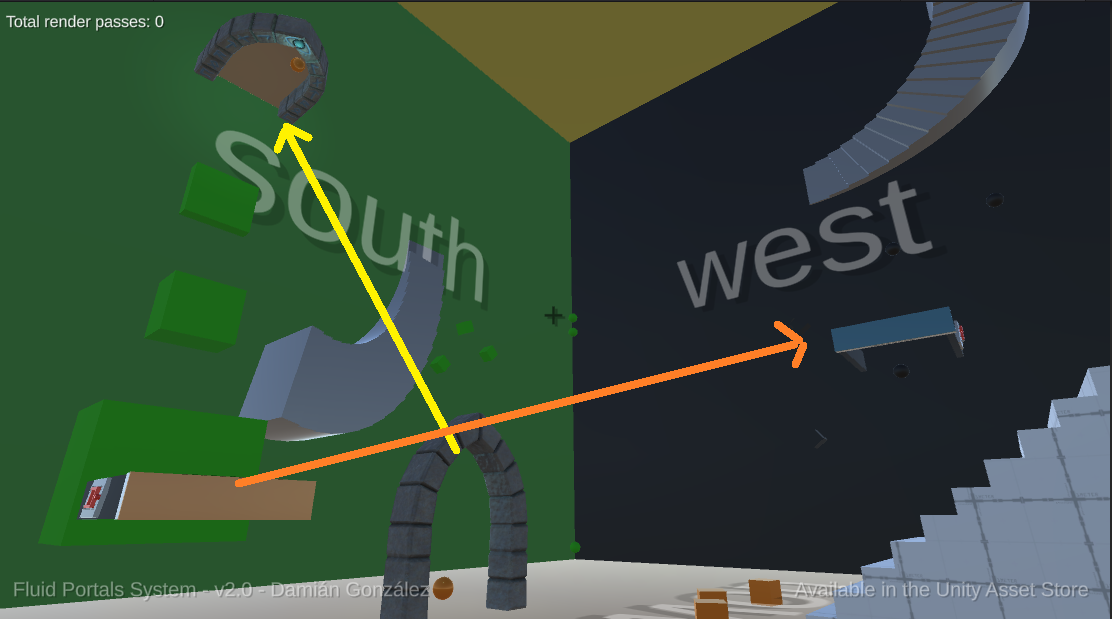 From version 2.0, a portal can lead to another "dimension", literally, as in an Escher painting, or as in the video games "Fragments of Euclid" or "Manifold Garden", and walk along the walls or through the ceiling, as seamlessly as in same-gravity portals.
To use this feature, you must:
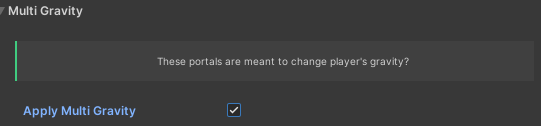
1) Activate the "Apply Multi Gravity" option:
From version 2.0, a portal can lead to another "dimension", literally, as in an Escher painting, or as in the video games "Fragments of Euclid" or "Manifold Garden", and walk along the walls or through the ceiling, as seamlessly as in same-gravity portals.
To use this feature, you must:
1) Activate the "Apply Multi Gravity" option:
 2) Add the "Custom Gravity" script to the player:
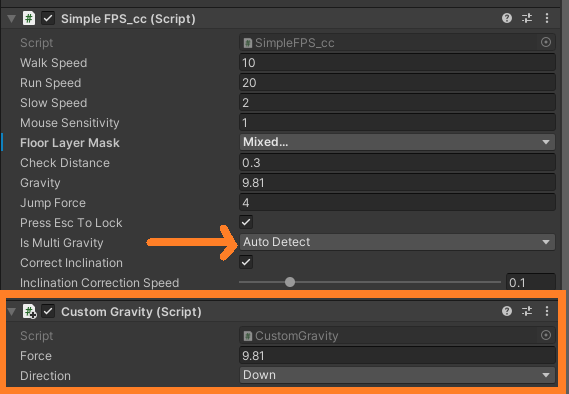 If you use one of the players that comes with the asset, make sure "Is Multi Gravity" is set to Yes or AutoDetect, and that's it.
Now the player will have a special gravity, it will jump and fall according to its relative "up" and "down" and not the general "up" and "down" of the world.
But, if you use a player other than the ones that come with the asset, you will have to prevent it from handling gravity on its own. Some tips to achieve it:
- If your character have a rigidbody, remove the "use gravity" option
- If it doesn't, check in the inspector if you see any exposed value for the fall speed and jump force, you could set those values to 0.
- If this doesn't work, you will have to go into your player's code and replace the fall speed with 0 and the jump force with 0 as well.
If you use one of the players that comes with the asset, make sure "Is Multi Gravity" is set to Yes or AutoDetect, and that's it.
Now the player will have a special gravity, it will jump and fall according to its relative "up" and "down" and not the general "up" and "down" of the world.
But, if you use a player other than the ones that come with the asset, you will have to prevent it from handling gravity on its own. Some tips to achieve it:
- If your character have a rigidbody, remove the "use gravity" option
- If it doesn't, check in the inspector if you see any exposed value for the fall speed and jump force, you could set those values to 0.
- If this doesn't work, you will have to go into your player's code and replace the fall speed with 0 and the jump force with 0 as well.
OPTIMIZATION
Since version 1.4, some options are available to reduce the impact on performance:
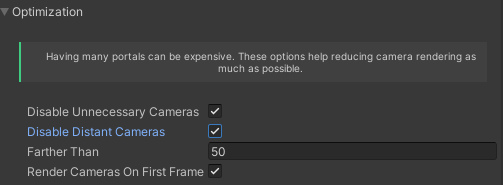 "Disable Unnecessary Cameras" only renders the cameras that are useful. If the player is not looking at the portal, their cameras won't render. So you can have 100 portals at no cost.
"Disable Distant Cameras" only renders cameras that are closer to the distance you set.
"Render Cameras on First Frame" (recommended), renders all the cameras in the first frame, so the portals have "something" to show insted of the skybox. For example, if "Disable Distant Cameras" is activated and with a value of 50 meters, this will cause the player, before entering that 50 meter range, to see "something" similar to what it should.
"Disable Unnecessary Cameras" only renders the cameras that are useful. If the player is not looking at the portal, their cameras won't render. So you can have 100 portals at no cost.
"Disable Distant Cameras" only renders cameras that are closer to the distance you set.
"Render Cameras on First Frame" (recommended), renders all the cameras in the first frame, so the portals have "something" to show insted of the skybox. For example, if "Disable Distant Cameras" is activated and with a value of 50 meters, this will cause the player, before entering that 50 meter range, to see "something" similar to what it should.
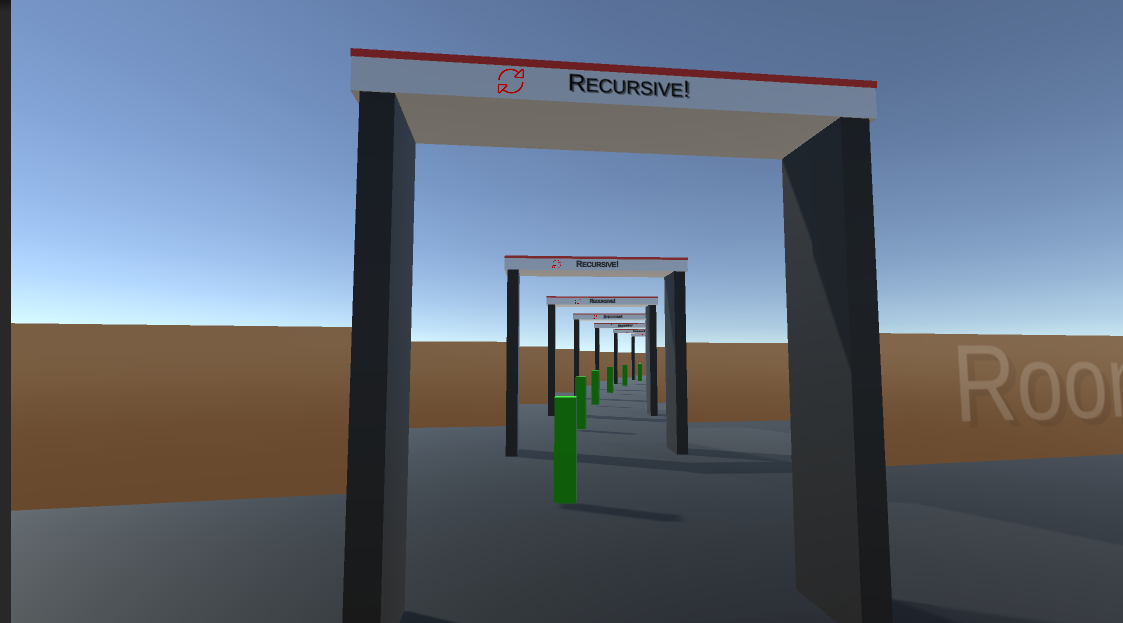
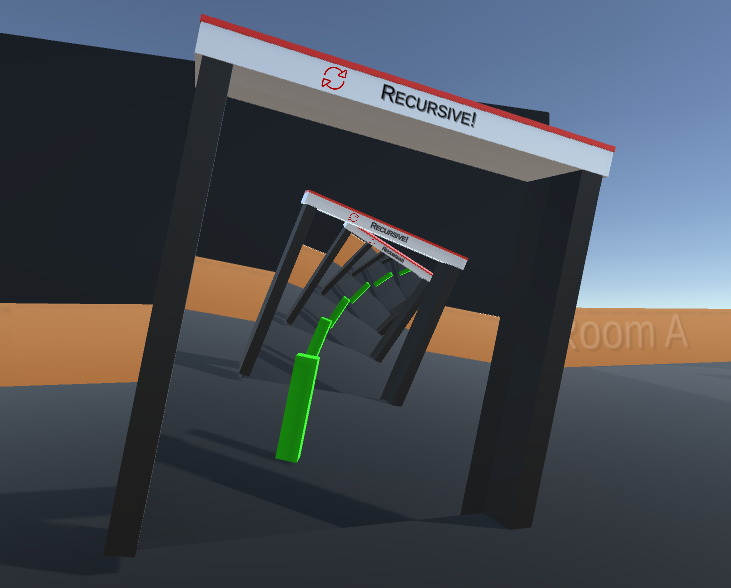
RECURSIVE RENDERING
Version 2.0 brings this long-awaited feature: being able to see the inside of a portal from another of the same group. This is: when both portals of a set are facing each other.
 If both portals are different groups, you're looking for "nested portals".
It is worth mentioning that this function can have an impact on performance, especially in URP and HDRP, since the portal camera is rendering several times per frame. Please the some tips below to reduce the amount of recursions.
If both portals are different groups, you're looking for "nested portals".
It is worth mentioning that this function can have an impact on performance, especially in URP and HDRP, since the portal camera is rendering several times per frame. Please the some tips below to reduce the amount of recursions.
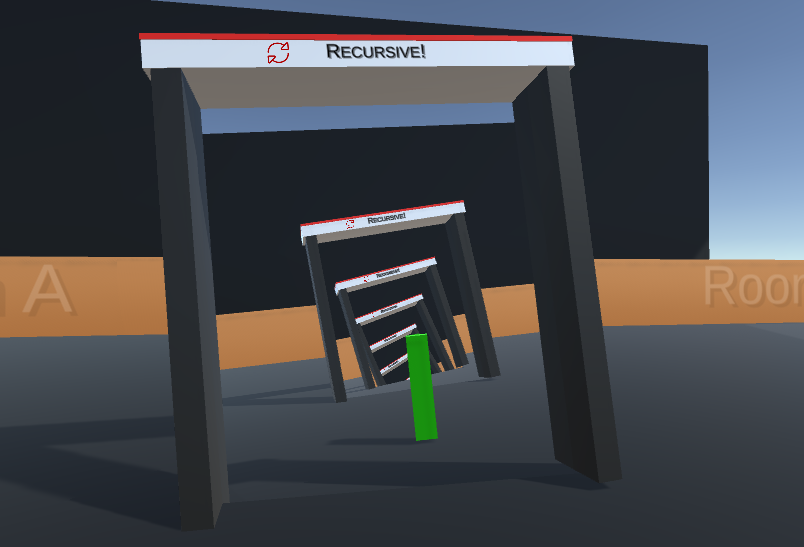
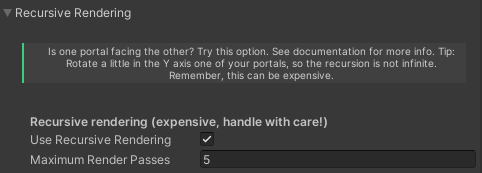 If you want this feature, activate the option and set how many times the portal is viewed within itself. For your own good, this number is limited to 20. If you need more, go inside PortalSetup.cs and remove this cap.
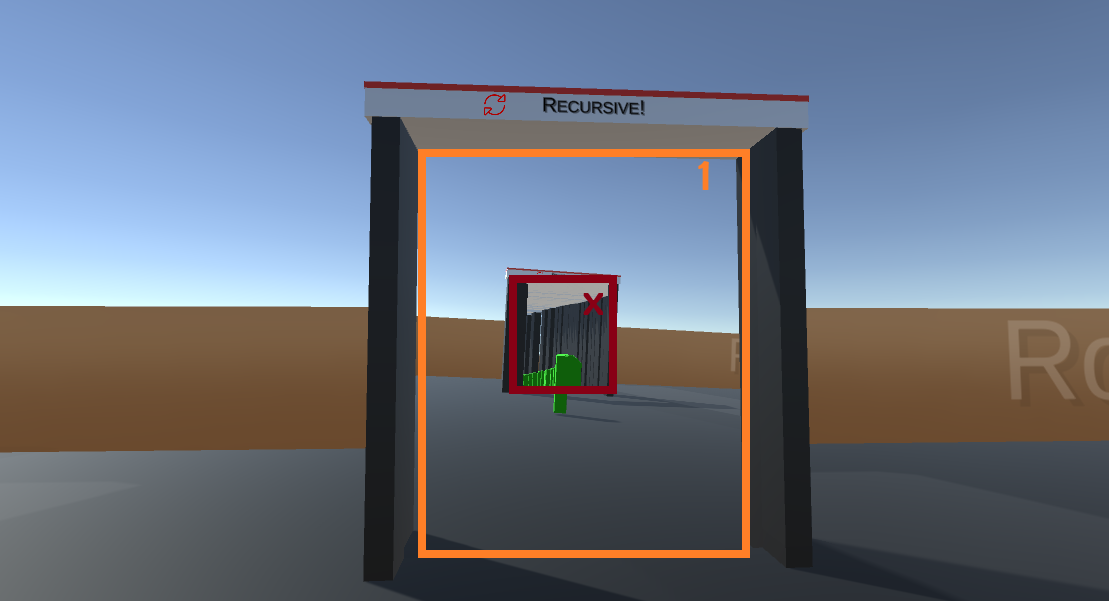
Example without recursion (only rendered 1 time):
If you want this feature, activate the option and set how many times the portal is viewed within itself. For your own good, this number is limited to 20. If you need more, go inside PortalSetup.cs and remove this cap.
Example without recursion (only rendered 1 time):
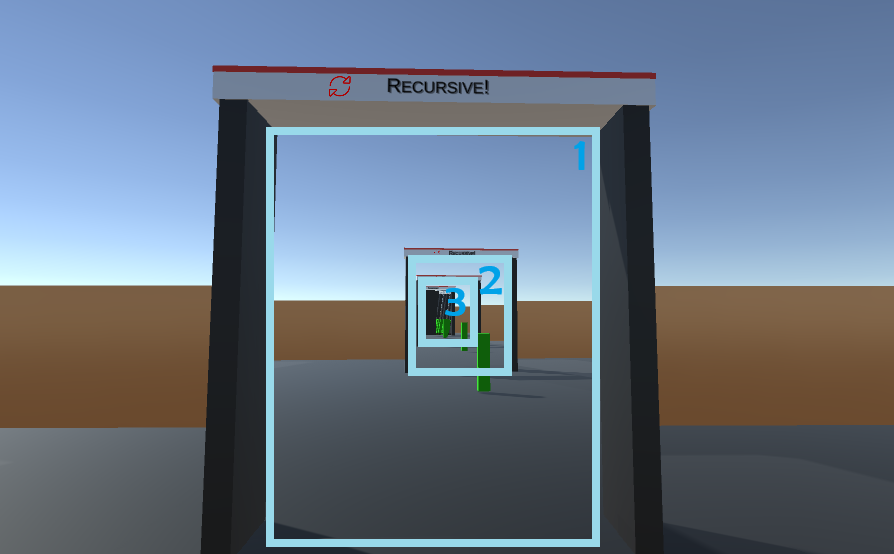
 Example with 3 recursions:
 A tip to avoid a large number of recursions is to rotate one of the portals a little on the Y axis, so that the recursion is not infinite. For example, in the first image, one portal is rotated only 3 degrees from the other, and that alone limits the recursion to 7.
Also, i'm working on a way to only go as far as needed. At this point (version 2.0) if you choose 7 recursions, it will renderer none (if the portal is being seen) or full 7, nothing in between. This will be addressed in future versions.
You can also rotate in other axes to obtain psychedelic effects:
A tip to avoid a large number of recursions is to rotate one of the portals a little on the Y axis, so that the recursion is not infinite. For example, in the first image, one portal is rotated only 3 degrees from the other, and that alone limits the recursion to 7.
Also, i'm working on a way to only go as far as needed. At this point (version 2.0) if you choose 7 recursions, it will renderer none (if the portal is being seen) or full 7, nothing in between. This will be addressed in future versions.
You can also rotate in other axes to obtain psychedelic effects:
If both portals are different groups, you're looking for "nested portals".
It is worth mentioning that this function can have an impact on performance, especially in URP and HDRP, since the portal camera is rendering several times per frame. Please the some tips below to reduce the amount of recursions.
If you want this feature, activate the option and set how many times the portal is viewed within itself. For your own good, this number is limited to 20. If you need more, go inside PortalSetup.cs and remove this cap.
Example without recursion (only rendered 1 time):
Example with 3 recursions:
A tip to avoid a large number of recursions is to rotate one of the portals a little on the Y axis, so that the recursion is not infinite. For example, in the first image, one portal is rotated only 3 degrees from the other, and that alone limits the recursion to 7.
Also, i'm working on a way to only go as far as needed. At this point (version 2.0) if you choose 7 recursions, it will renderer none (if the portal is being seen) or full 7, nothing in between. This will be addressed in future versions.
You can also rotate in other axes to obtain psychedelic effects:
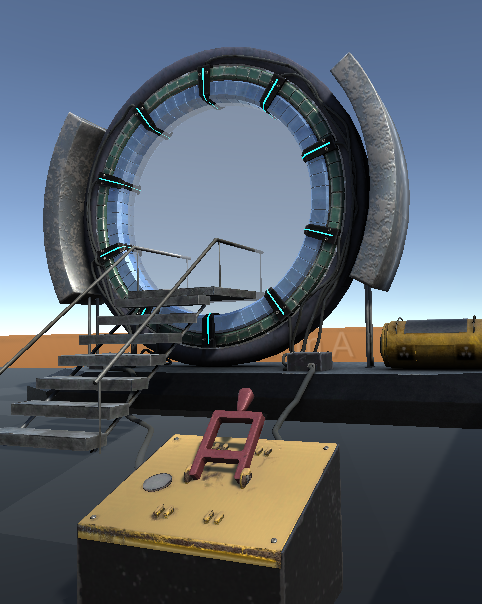
SWITCHES AND LIGHTS
a. Implementation
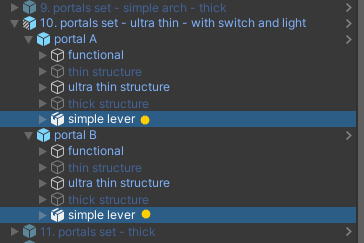
Some portal prefabs have switches or buttons to turn portal on or off.
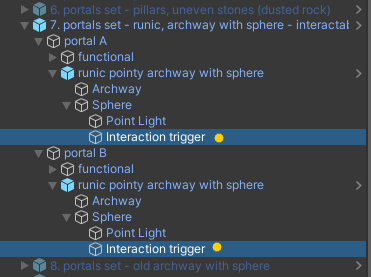
 ...or, in the case of portals with a sphere, deactivate the "Interaction trigger" object:
 If you want to use them with the player that comes with the asset, you don't need to do anything else. If you want to use them with another player, you can simply attach the "Portal Switch Interaction" script to the player's camera:
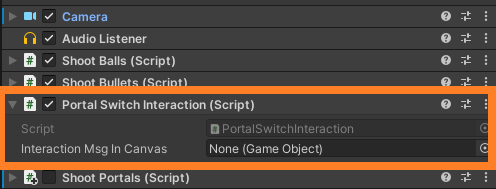 This script requires some canvas element to show or hide. You can borrow the "interaction message" object from the demo scene (child of the Canvas) and paste it inside your own canvas. If you rename that object, you must reference it in the player's camera. If you leave it the same name, the script will find it automatically.
b. Initial state
You can set the initial state of the portal: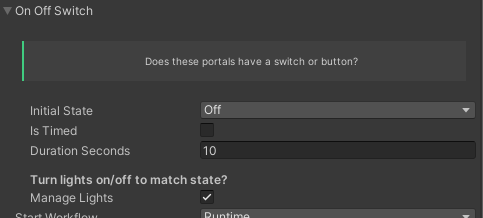
c. Timer
If you want the switch to slowly return and turn off, you can enable the "Is Timed" option and set the time in seconds.WORKFLOWS (RUNTIME / DEPLOYED)
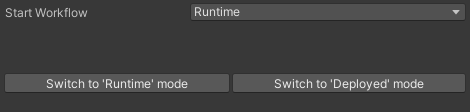
In order to function, each group of portals requires a complex initialization. This can be done when entering Play mode (Runtime mode) or can be prepared beforehand (Deployed mode).
The advantages of "deployed" mode are:
1. the game starts faster
2. it allows you to alter the initial configuration so it remains as you want when starting the game, no surprises.
To change modes you can use the buttons below the whole script:
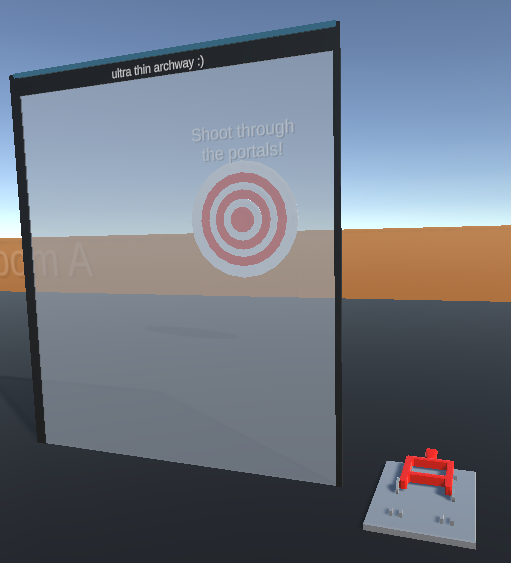
RAYCAST TELEPORTING
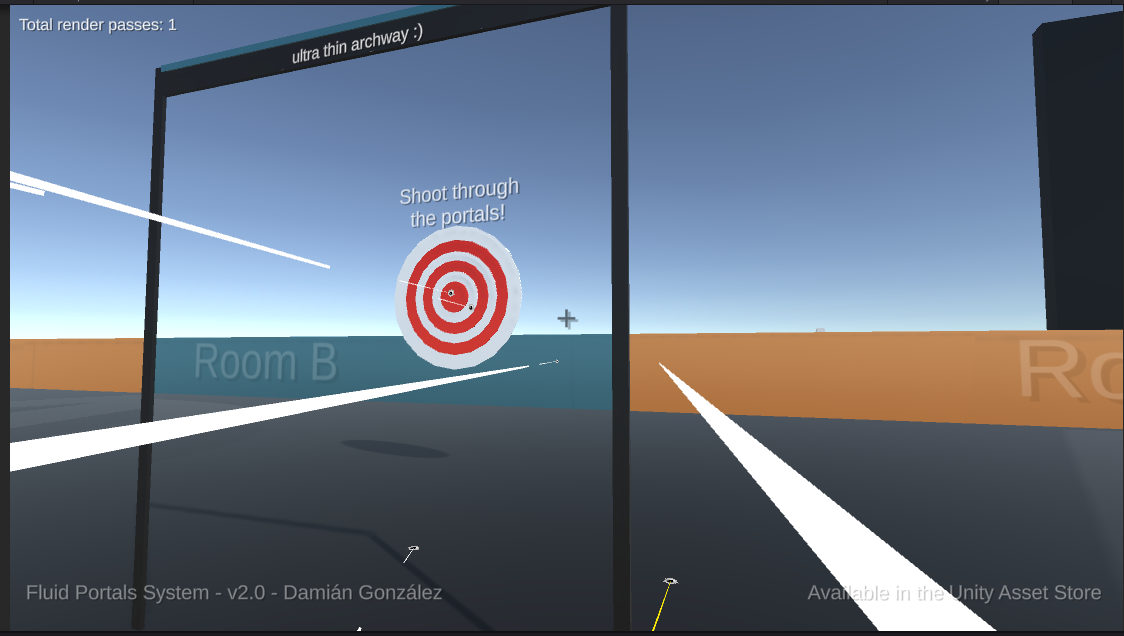 Since version 2.0, raycasts can also go trough portals. This is ideal for shooting games.
Achieving this is very easy. You just need to replace "Physics" with "PortalRaycast", and remember to include above everything:
Since version 2.0, raycasts can also go trough portals. This is ideal for shooting games.
Achieving this is very easy. You just need to replace "Physics" with "PortalRaycast", and remember to include above everything:
using DamianGonzalez.Portals;
Example with minimum parameters:
 All the way until full explicit parameters:
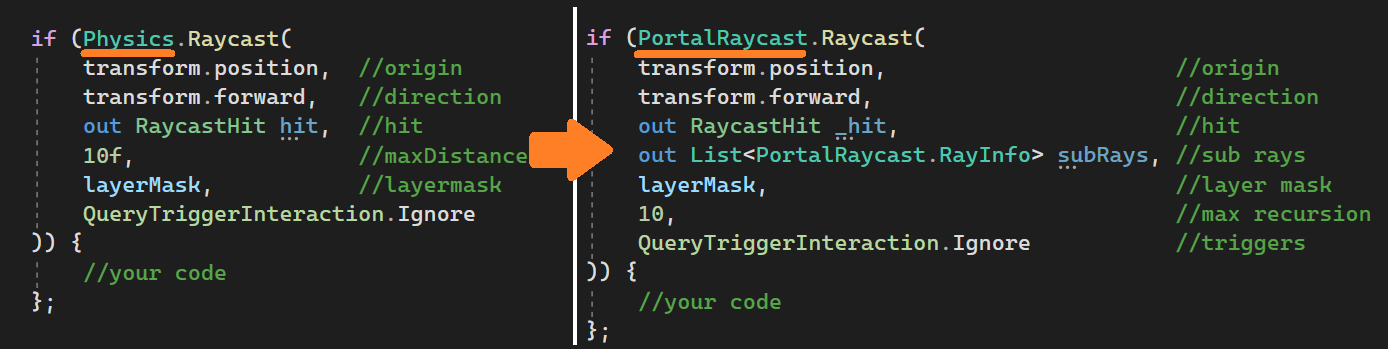 In the latter case, a very useful variable is added which is a listing of all the individual portions of the ray with its start and end positions. A ray crossing 1 portal has 2 subrays (one from the source to the portal, one from the other portal to the destination).
You can see the ShootBullets.cs script (inside Demo/Scripts) to see a real example of how it works, and how individual lines are drawn.
Again, if you use any of the players that come with the asset, you don't need to do anything. With left click you shoot and the rays can teleport.
In the latter case, a very useful variable is added which is a listing of all the individual portions of the ray with its start and end positions. A ray crossing 1 portal has 2 subrays (one from the source to the portal, one from the other portal to the destination).
You can see the ShootBullets.cs script (inside Demo/Scripts) to see a real example of how it works, and how individual lines are drawn.
Again, if you use any of the players that come with the asset, you don't need to do anything. With left click you shoot and the rays can teleport.
TROUBLESHOOTING
These are some of the problems that users usually have, and more are to be added shortly:
 Import the package that corresponds to your current pipeline and that's it.
Alternatively, Unity gives you tools to convert materials to your pipeline automatically.
Import the package that corresponds to your current pipeline and that's it.
Alternatively, Unity gives you tools to convert materials to your pipeline automatically.
a. The player does not cross
(this section will be filled tomorrow, friday)b. Pink materials
If you see everything pink (or, actually, magenta), it's because the materials do not correspond to the pipeline you are using (for example you use URP and the materials are from built-in render pipeline) The solution is very simple: There is a folder that contains material converters:
Import the package that corresponds to your current pipeline and that's it.
Alternatively, Unity gives you tools to convert materials to your pipeline automatically.
c. Flickering when crossing
If you see a flicker when the player is teleporting, this is because the camera is crossing the portal plane before teleporting. Try the following (but not everything at once; try one solution at a time and be patient): - Increase the Elastic Plane Offset a little (Advanced options) - If your character is in 3rd person, lower the "z" value of Near Offset Position (Player options) - Move the clipping offset (Advanced options) - If you're not using clones, try using them, at least for the playerd. Some objects cannot be seen through the portal
In Advanced, increase the Depth Texture value. Try values like 32 or 64. If you see a "z-fighting" effect, you may need to separate the objects from each other a little.e. The camera travels
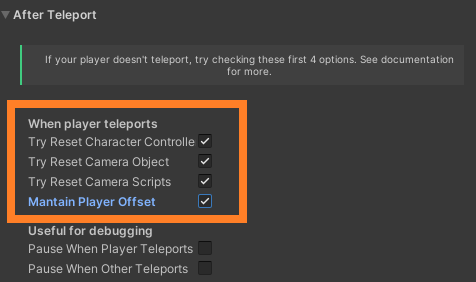
If the camera is separated (not a child) from the player, and especially if it has a "smooth" effect, it is possible that the camera is not updating its position when transported, and it's travelling slowly from the last known position to the new one, ruining the seamless effect. Try activating the "Maintain Player Offset" option in After Teleport, and the 3 previous checks:
CONTACT
If you have a problem that this documentation has not helped you solve, you can contact me:
hello@damian-gonzalez.com