1. ONLINE DOCUMENTATION AND DEMO
2. PRESENTATIONS AND RENDER PIPELINES
3. HOW IT WORKS
4. IMPLEMENTATION
a. Quick implementation
b. In detail
c. Using another controller
d. Advanced use of prefabs
e. Direct calls to the code
1. Static references
2. Move elevator by code
3. Force doors by code
5. BUILDER OPTIONS
a. "New Elevator Setup" section
b. "Floor Numeration" section
c. "Style Setup" section
d. "Buttons Pad Setup" section
e. "Lighting" section
f. "Advanced" section
g. Builder buttons
6. ELEVATOR BRAIN OPTIONS
a. "Speed" section
b. "Avoid player bouncing while traveling" section
c. "Details" section
d. "Not everything is pink" section
e. Others
7. CREDITS AND CONTACT
Thank you for purchasing this asset!
Don't forget to leave an honest review on the Asset Store.
 ONLINE DOCUMENTATION AND DEMO
This is an online documentation. I'll keep this page updated with the latest issues and troubleshooting.
So, it is highly recommended to follow this document instead of reading the documentation within the downloaded asset.
Useful links:
You can play the demo scenes yourself:
HDRP demo scene
Built-in demo scene
Or you can watch this "gameplay" of the demo scene:
 PRESENTATIONS AND RENDERING PIPELINES
This "Modern Elevators" asset has versions compatible with:
- Built-in Render Pipeline | Asset Store page
- HDRP (High Definition Render Pipeline) | Asset Store page
With the double purpose of considerably reducing the size of the package and speeding up your implementation, the 2 presentations mentioned are published as individual assets, all available in the Unity Asset Store. This documentation corresponds to "Modern Elevators" in all its presentations.
IMPORTANT: If you feel pressure to choose the right render pipeline, don't worry: by buying one of these assets you can switch to the other presentations at no additional cost. For example, if you buy Built-in RP version, you will be able to download HDRP version for free.
 HOW DOES THIS ASSET WORK / WHAT DOES IT DO?
It is important to state that this is not a static asset like most environmental assets. This is a fluid GENERATOR of elevators and their structures. With this asset you can choose how you want your building and generate the environment with a single click.
This asset provides a fully functional elevator builder system, containing:
- A constructor module to generate multiple elevators and their environments, in a personalized way
- All the necessary prefabs to build everything with a single click
- High quality textures (2048 x 2048)
- Sounds for the elevator, lights, doors, switches and buttons
- 2 demo scenes for day and night
- 1 Simple First Person Controller with Rigidbody
- 1 Simple First Person Controller with Character Controller
Important: Everything you see in both videos in this page (demo scene and technical video) can be done with this asset as it is, without anything additional.
The constructor will let you choose:
- How many floors you want to create
- How many elevators per floor
- The color of the marble of the fronts
- The type of numbers in the corridors
- The type of numbers on the front
- Whether you want a mirror inside the elevator or not
- The layout of the buttons on the pad
- How much the elevator shakes
- If you want to add the corridors or not
- Wheter you want to add shadow casters
- ...And many more options (detailed below)
Once you build your elevator and its environment, you will have a 100% functional personalized elevator and a controller that allows you to call the elevators, get on, go through the lobby and corridors, disarm the roof of the elevators and use the internal stairs of the pit to move between floors and manually activate the door safety mechanisms to go inside again.
 IMPLEMENTATION (HOW TO USE)
a. QUICK IMPLEMENTATION
Implementing this asset is very simple. In short: Just drag the "Elevator builder" prefab into your scene and you're ready to experience everything from that object's inspector. Inside the Elevator Builder press the "Build" button (not in Play mode). And that's it, you've made a building with working elevators inside.b. IN DETAIL
In detail, from scratch:c. USING ANOTHER CONTROLLER
This asset includes two simple first-person controllers (one with a Rigidbody and one with a Character Controller). Either of the 2 provided controllers will allow you to call the elevators, getting on, going through the lobby and corridors, you will be able to disarm the roof of the elevators and use the internal stairs of the pit to move between the floors, manually activate the door mechanism. All the interactions are made with the interaction input (E key, or mouse button, or Ctrl key, or joystick button), using the Old Input system. However, you may prefer to use another controller in first person and not one of the ones provided in the asset. What you should keep in mind in that case is that your controller must interact with the elevators. To do that you would have to follow one of the following methods: METHOD 1: Reuse part of the supplied controller. If you open either of the two prefabs contained in the "Prefabs/Simple First Person Controllers" folder you will see that these controllers have a camera as a child and also a canvas with an icon. You'll also see that the camera has a script called "ElevatorInteraction", and the canvas icon has another script called "InteractionIcon". The first deals with looking for something that can be interacted with, and asks the second to color the icon white or green depending on whether or not it has found something. So: - Copy that entire Canvas (with its icon and icon script) and paste it into your controller's camera. - Add the "ElevatorInteraction" script to your controller's camera. - Optional: configure that script you added, dragging the icon to the "Interact Icon" variable and choosing the ElevatorInteractable layer mask. The latter is not strictly necessary, the code will try to find the Layer and assign it. METHOD 2: Own code If you're good with code, you can copy some of the code from the ElevatorInteraction.cs script into your controller code. All it does is cast a RayCast forward looking for the ElevatorInteractable layer. If the raycast finds any element with the ElevatorInteractable layer, some icon in the UI should indicate the possibility of interaction and check if you press a certain key. If it's a door, you can access its DoorTrigger script and ask it to Toggle() . If it's a button or switch, you can access its ElevatorButton script and ask it to Press() . The code in ElevatorInteraction.cs is extremely clear and commented. With a minimum of experience you will be able to understand what it is about.d. ADVANCED USE OF PREFABS
If you want more control over the lift and its environment, keep in mind: 1) The Builder uses prefabs (like Lego pieces) to build. If those prefabs are changed (even after you've built and detached), your build will change. 2) Similarly, you could create your own prefabs (for example, your own hallway), or variants of the original prefabs (for example, take the hallway that comes with the asset, modify it, and save it as a variant), and link the builder to the new parts. The builder will build with whatever you feed it with.e. DIRECT CALLS TO THE CODE
1) Static references
Note that referencing your elevators is very easy, you don't need proper references, since the ElevatorBrain class contains static references to all elevators, in the variable ElevatorBrain.elevators You will always have a quick reference from any script to the first elevator in your build with:
ModernElevator.ElevatorBrain.elevators[0]
2) Move elevator by code
To move the elevator by code, keep in mind that (unlike the much simpler Old Elevator), these modern elevators follow a queue behavior: they move following a list of pending floors, so the main action is not "go to this floor" but "add this floor to the list" (the equivalent of pressing an elevator button in the pad). If you want to add a floor to the list , you can write, from any script and without previous references:
ModernElevator.ElevatorBrain.elevators[e].AddFloorToList(n);
...where e is the elevator number (starting at 0) and n is the floor number, starting at 0. (0 is the bottom floor, 1 is the next, etc. It doesn't matter what number the floor signs show.)
If what you want is to *immediately* send the elevator to a floor, ignoring the queue of pending floors, you must first purge the list:
ModernElevator.ElevatorBrain.elevators[e].PurgeFloorList();
ModernElevator.ElevatorBrain.elevators[e].AddFloorToList(n);
3) Force doors by code
There are also static references to the switches that open the doors. If for example you wanted to force open the doors on the 3rd floor of the 2nd elevator, you can write the following from any script:
ModernElevator.ElevatorBrain.elevators[1].switches[2].Activate();
 BUILDER OPTIONS
a. "New Elevator Setup" section
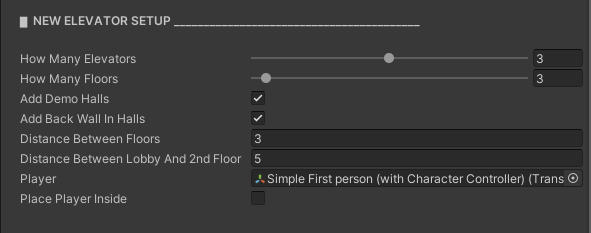 - How Many Elevators: How many elevators you want in each floor of your building.
- How Many Floors: An integer between 2 and 30 that represents the number of stories to be built. The limit of 30 is given only by the limited size of the button pad. If you need more floors, you can go into the script and remove the [Range...] attribute from the definition of the Floors variable. Be careful, though: Too many floors can ruin the performance of your game, specially if you have more than 1 elevator and you keep all the lights (see below).
- Add Demo Halls: If you choose this option, small demo halls will be added on each floor, so you can walk through them.
- Add Back Walls in Halls: If you choose this option, the halls will have a wall at the end.
- Distance Between Floors: Represents the distance in meters between the ceiling of a level and the floor of the level immediately above. The default value is 3 meters.
- Distance Between Lobby and 2nd Floor: If you want a greater distance between the first two floors, you can choose it with this variable. Only works if variable "lobby as 1st floor" is set to true.
- Player: A reference to the main player. If you leave it unassigned, the code will try to search for the player automatically by their "Player" tag. This is only useful for using the Elevator Brain's "Avoid Bouncing" option and for the next option.
- Place player inside: If you choose this option, the player will be placed in the lobby.
- How Many Elevators: How many elevators you want in each floor of your building.
- How Many Floors: An integer between 2 and 30 that represents the number of stories to be built. The limit of 30 is given only by the limited size of the button pad. If you need more floors, you can go into the script and remove the [Range...] attribute from the definition of the Floors variable. Be careful, though: Too many floors can ruin the performance of your game, specially if you have more than 1 elevator and you keep all the lights (see below).
- Add Demo Halls: If you choose this option, small demo halls will be added on each floor, so you can walk through them.
- Add Back Walls in Halls: If you choose this option, the halls will have a wall at the end.
- Distance Between Floors: Represents the distance in meters between the ceiling of a level and the floor of the level immediately above. The default value is 3 meters.
- Distance Between Lobby and 2nd Floor: If you want a greater distance between the first two floors, you can choose it with this variable. Only works if variable "lobby as 1st floor" is set to true.
- Player: A reference to the main player. If you leave it unassigned, the code will try to search for the player automatically by their "Player" tag. This is only useful for using the Elevator Brain's "Avoid Bouncing" option and for the next option.
- Place player inside: If you choose this option, the player will be placed in the lobby.
b. "Floor Numeration" section:
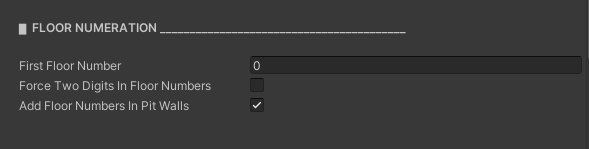 - First floor number: Represents the number of the lower floor. The default value is 1, so the lobby will be 1, according to US custom. If you instead want your bottom floor to be 0, L, G, or similar, and the next floor to be 1, you can leave this variable at 0 and then replace the indications of "0" with whatever sprite you want.
- Force Two Digits in Floor Numbers: With this option, regardless of the number of floors, you will always see 2 digits (01, 02, etc). Without this option, you will see them as 1, 2, etc, and 2 digits only when needed.
- Add Floor Numbers In Pit Walls: Checking this option will add black painted numbers on the front and back walls of the elevator pit.
- First floor number: Represents the number of the lower floor. The default value is 1, so the lobby will be 1, according to US custom. If you instead want your bottom floor to be 0, L, G, or similar, and the next floor to be 1, you can leave this variable at 0 and then replace the indications of "0" with whatever sprite you want.
- Force Two Digits in Floor Numbers: With this option, regardless of the number of floors, you will always see 2 digits (01, 02, etc). Without this option, you will see them as 1, 2, etc, and 2 digits only when needed.
- Add Floor Numbers In Pit Walls: Checking this option will add black painted numbers on the front and back walls of the elevator pit.
c. "Style Setup" section:
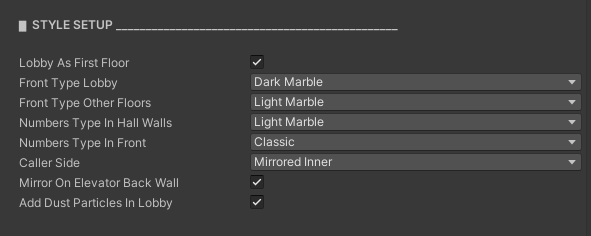 - Lobby as First Floor: Checking this option will build a spacious demo lobby instead of a corridor on the lower floor.
- Front Type Lobby: The type of marble the front of each elevator will have, in the lobby. You can choose between dark marble and light marble.
- Front Type Other Floors: The type of marble the front of each elevator will have, in the rest of stories.
- Numbers Type in Hall Walls: Indicators of the floor number can be placed on the walls of the halls. You can choose between:
a) None
b) Mirror (mirror): The floor number carved on a mirrored glass plate.
c) Light marble: The floor number printed on a marble plate
d) Dark marble
e) Classic (classic): metallic numbers
- Numbers Type in Front: In the case of having more than 1 elevator per floor, you can put the floor numbers on the walls between elevators.
- Caller Side: The elevator callers can be placed according to the following options:
a) Always left: Always on the left side, in all elevators
b) Always right: Always on the right side in all elevators
c) Mirrored inner: In the odd elevators, on the right side. In the even ones, on the left side. This is the default option.
d) Mirrored outer: In the odd elevators, on the left side. In the even elevators, on the right side.
- Mirror on Elevator Back Wall: This option is not available for Built-in Render Pipeline. If you choose this option, a mirror will be added inside the elevator. Otherwise it will be replaced with a panel. Keep in mind, especially for HDRP and even more so if you add multiple lifts, that this can be expensive in terms of performance. Once builded, you will be able to change the resolution of the mirrors, going to "Mirror" in the hierarchy > "capture settings" > resolution. By default it has a value of 512. You can raise it to 1024 (which is a good quality/cost ratio) or much more.
- Lobby as First Floor: Checking this option will build a spacious demo lobby instead of a corridor on the lower floor.
- Front Type Lobby: The type of marble the front of each elevator will have, in the lobby. You can choose between dark marble and light marble.
- Front Type Other Floors: The type of marble the front of each elevator will have, in the rest of stories.
- Numbers Type in Hall Walls: Indicators of the floor number can be placed on the walls of the halls. You can choose between:
a) None
b) Mirror (mirror): The floor number carved on a mirrored glass plate.
c) Light marble: The floor number printed on a marble plate
d) Dark marble
e) Classic (classic): metallic numbers
- Numbers Type in Front: In the case of having more than 1 elevator per floor, you can put the floor numbers on the walls between elevators.
- Caller Side: The elevator callers can be placed according to the following options:
a) Always left: Always on the left side, in all elevators
b) Always right: Always on the right side in all elevators
c) Mirrored inner: In the odd elevators, on the right side. In the even ones, on the left side. This is the default option.
d) Mirrored outer: In the odd elevators, on the left side. In the even elevators, on the right side.
- Mirror on Elevator Back Wall: This option is not available for Built-in Render Pipeline. If you choose this option, a mirror will be added inside the elevator. Otherwise it will be replaced with a panel. Keep in mind, especially for HDRP and even more so if you add multiple lifts, that this can be expensive in terms of performance. Once builded, you will be able to change the resolution of the mirrors, going to "Mirror" in the hierarchy > "capture settings" > resolution. By default it has a value of 512. You can raise it to 1024 (which is a good quality/cost ratio) or much more.
d. "Buttons Pad Setup" section:
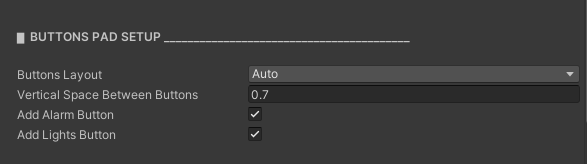 - Buttons Layout: You can choose if you want 1, 2, 3 columns, or automatic. If you choose "auto", 1 column of buttons will be used for 2~9 floors, 2 columns of buttons for 10~19 floors, and 3 columns for more than 20 floors.
- Vertical Space Between Buttons: You can change this value if you want the buttons closer or farther from each other. It is recommended to leave its default value: 0.5
- Add Alarm Button: If you choose this option, a button is added to the bottom of the pad to fire a loud ringing alarm.
- Add Lights Button: If you choose this option, a button is added to turn the elevator interior lights on and off.
- Buttons Layout: You can choose if you want 1, 2, 3 columns, or automatic. If you choose "auto", 1 column of buttons will be used for 2~9 floors, 2 columns of buttons for 10~19 floors, and 3 columns for more than 20 floors.
- Vertical Space Between Buttons: You can change this value if you want the buttons closer or farther from each other. It is recommended to leave its default value: 0.5
- Add Alarm Button: If you choose this option, a button is added to the bottom of the pad to fire a loud ringing alarm.
- Add Lights Button: If you choose this option, a button is added to turn the elevator interior lights on and off.
e. "Lighting" section:
 Within the "Lighting" section you will be able to choose what type of lighting (none, Baked, Mixed, Realtime) to apply for each group of lights: Lobby lights, corridor lights, elevator lights and pit lights.
In order to help you increase your FPS, by default "baked" is proposed for lobby and corridors (this requires you to bake your lights afterwards), "realtime" for elevators (since they move and the light can flicker), and "no lights" for the pits.
You can also choose the amount of lights. This is especially useful for Built-in Render Pipelines, where you cannot afford to waste lights. Most elevators parts has two set of lights: one for "full" lights and another for "reduced" lights. With this variable you choose which one to use.
In a second part of this section you can choose:
- Add Reflection Probe In Lobby: This is useful to achieve better reflections on metallic materials. You might have to "Bake" each probe after building.
- Add Reflection Probes In Other [floors].
- Add shadow casters: Adds an invisible outer casing to the building in order to stop light and make sure it doesn't leak around corners or edges. This will allow you (as in the daytime sample scene) to have a environment with strong directional lights in the lobby and total darkness in the pit. If you use HDRP and despite using this option you keep geting light leaking inside, consider configuring your directional light by enabling "shadow map", changing "Update Mode" to "every frame" and/or rising the quality of "contact shadows".
Within the "Lighting" section you will be able to choose what type of lighting (none, Baked, Mixed, Realtime) to apply for each group of lights: Lobby lights, corridor lights, elevator lights and pit lights.
In order to help you increase your FPS, by default "baked" is proposed for lobby and corridors (this requires you to bake your lights afterwards), "realtime" for elevators (since they move and the light can flicker), and "no lights" for the pits.
You can also choose the amount of lights. This is especially useful for Built-in Render Pipelines, where you cannot afford to waste lights. Most elevators parts has two set of lights: one for "full" lights and another for "reduced" lights. With this variable you choose which one to use.
In a second part of this section you can choose:
- Add Reflection Probe In Lobby: This is useful to achieve better reflections on metallic materials. You might have to "Bake" each probe after building.
- Add Reflection Probes In Other [floors].
- Add shadow casters: Adds an invisible outer casing to the building in order to stop light and make sure it doesn't leak around corners or edges. This will allow you (as in the daytime sample scene) to have a environment with strong directional lights in the lobby and total darkness in the pit. If you use HDRP and despite using this option you keep geting light leaking inside, consider configuring your directional light by enabling "shadow map", changing "Update Mode" to "every frame" and/or rising the quality of "contact shadows".
f. "Advanced" section:
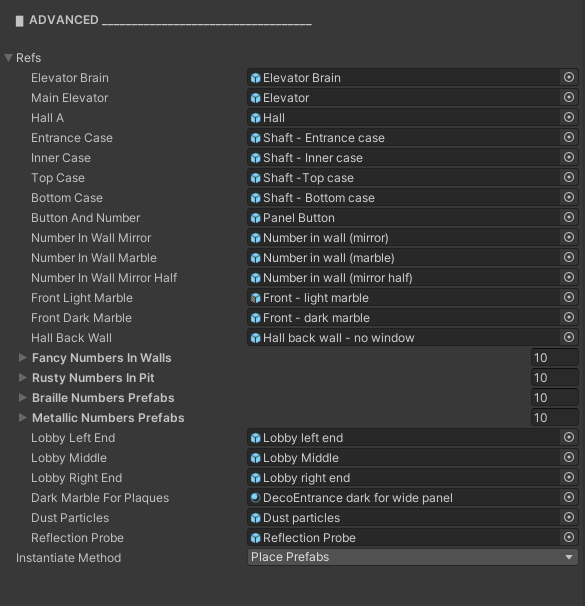 - Refs: A variable holding references to the various internal prefabs that the Builder uses to generate the entire structure. It is recommended to leave it as it is, unless you want to replace one part with another.
- "Instantiate method": You can choose whether intantiate parts using the PrefabUtility.InstantiatePrefab() method (it will place prefabs, shown with blue labels in the hierarchy), or using the Instantiate() method, which will place independent instances (gameobjects with white labels in the hierarchy).
- Refs: A variable holding references to the various internal prefabs that the Builder uses to generate the entire structure. It is recommended to leave it as it is, unless you want to replace one part with another.
- "Instantiate method": You can choose whether intantiate parts using the PrefabUtility.InstantiatePrefab() method (it will place prefabs, shown with blue labels in the hierarchy), or using the Instantiate() method, which will place independent instances (gameobjects with white labels in the hierarchy).
g. Builder buttons:
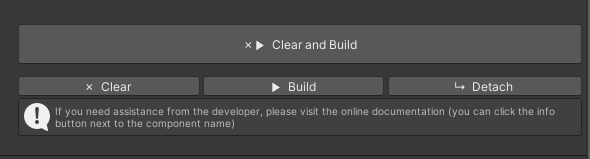 Below all the options you will see 4 buttons.
- Build: to build a new set of elevators and its environment as you requested. A new child of the builder will be generated with your creation.
- Clear all: to remove all childs of the builder.
- Detach: to move the created elevator(s) out of the builder, so it's safe and you don't remove them by accident.
- Clear & Build: A combination of the first two, to build replacing what you have done before.
Note: This buttons are drawn not by the ElevatorBuilder script, but by the ElevatorBuilderEditor script. This is the only function of that editor script, and it's not strictly necessary, since you can achieve the same functionalities from the contextual menu of the ElevatorBuilder script (the same menu of "remove component").
At all times the elevators (whether or not they are inside the Builder) are completely autonomous and do not need the Builder. Therefore, once you have your elevator ready and you have pressed Detach, you can remove the Builder, it will no longer be necessary.
Below all the options you will see 4 buttons.
- Build: to build a new set of elevators and its environment as you requested. A new child of the builder will be generated with your creation.
- Clear all: to remove all childs of the builder.
- Detach: to move the created elevator(s) out of the builder, so it's safe and you don't remove them by accident.
- Clear & Build: A combination of the first two, to build replacing what you have done before.
Note: This buttons are drawn not by the ElevatorBuilder script, but by the ElevatorBuilderEditor script. This is the only function of that editor script, and it's not strictly necessary, since you can achieve the same functionalities from the contextual menu of the ElevatorBuilder script (the same menu of "remove component").
At all times the elevators (whether or not they are inside the Builder) are completely autonomous and do not need the Builder. Therefore, once you have your elevator ready and you have pressed Detach, you can remove the Builder, it will no longer be necessary.
 ELEVATOR BRAIN OPTIONS
The "Elevator Brain" is the main script in play mode, in charge of its operation. It contains many options that you can configure once you have pressed "Build" in the builder. Note, however, that the options you choose will be overriden with the default ones if you press "Clear" or "Clear and Build" from the Builder.
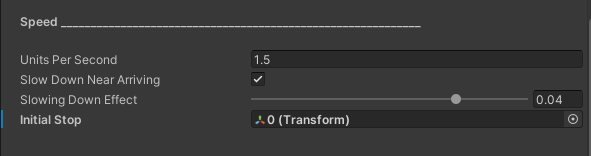 - Units Per Second: It is the normal speed of the elevator, expressed in meters per second.
- Slow Down Near Arriving: If this option is activated, the elevator will progressively decrease its speed when it is less than 1 meter from its destination.
- Slowing Down Effect: The higher this value, the greater the braking effect described in the previous variable will be.
- Initial Stop: The initial position of the elevator. The value of this variable is of type Transform and must be one of the children of "Stops". Stops is the only child of the "elevator brain" and contains each of the positions in which the elevator can stop.
- Units Per Second: It is the normal speed of the elevator, expressed in meters per second.
- Slow Down Near Arriving: If this option is activated, the elevator will progressively decrease its speed when it is less than 1 meter from its destination.
- Slowing Down Effect: The higher this value, the greater the braking effect described in the previous variable will be.
- Initial Stop: The initial position of the elevator. The value of this variable is of type Transform and must be one of the children of "Stops". Stops is the only child of the "elevator brain" and contains each of the positions in which the elevator can stop.
 - Avoid bouncing:
With both Rigidbody controllers and Character Controller controllers, the player typically tends to bounce or shake when a platform they are standing on moves vertically. This functionality recognizes when the player has entered the elevator and makes it a child of the elevator, forcing the player to move fluidly along with the elevator (and not as a result of physics), avoiding the ricochet effect.
- Player: A reference to the main player. If left unassigned, it will try to search for the player automatically by their "Player" tag.
- Avoid bouncing:
With both Rigidbody controllers and Character Controller controllers, the player typically tends to bounce or shake when a platform they are standing on moves vertically. This functionality recognizes when the player has entered the elevator and makes it a child of the elevator, forcing the player to move fluidly along with the elevator (and not as a result of physics), avoiding the ricochet effect.
- Player: A reference to the main player. If left unassigned, it will try to search for the player automatically by their "Player" tag.
 - Delay Start Moving: When the doors close, the elevator does not start moving immediately. This variable indicates the time between the total closing of the doors and the beginning of the movement.
- Delay Opening Doors: The time between the stop of the elevator and the opening of the doors.
- Wait Time Between Stops: How long the elevator holds with open doors before closing them and continuing the journey.
- Debug Mode: If you activate this option you will see in the console messages about the behavior of the elevator. Useful if you want to modify the code.
- Delay Start Moving: When the doors close, the elevator does not start moving immediately. This variable indicates the time between the total closing of the doors and the beginning of the movement.
- Delay Opening Doors: The time between the stop of the elevator and the opening of the doors.
- Wait Time Between Stops: How long the elevator holds with open doors before closing them and continuing the journey.
- Debug Mode: If you activate this option you will see in the console messages about the behavior of the elevator. Useful if you want to modify the code.
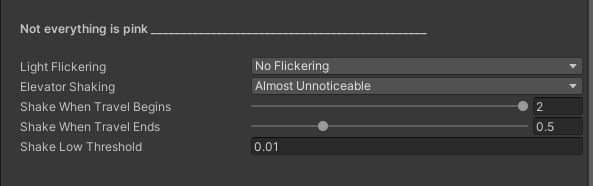
 Here you will find some options that add a touch of realism (or fear, depending on the intensity) to the travel experience:
- Light Flickering: How often the elevator lights flicker. Possible values are:
- No flickering
- Almost Unnoticeable
- Annoying
- Heavy
- Nightmare
For reference, in "almost unnoticeable" mode the flashing occurs after a random time between 3 and 6 seconds (a lot) and in each flash the light stays off for a random time between 0.05 and 0.1 seconds (very little).
On the other extreme, in "nightmare" mode, the flashing occurs after a random time between 0.05 and 0.5 seconds (very little) and in each flash the light remains off for a random time between 0.1 and 1.5 seconds (quite a long time).
Intermediate modes handle intermediate values between these two.
- Elevator Shaking: With nearly identical options to the previous variable, this controls how often and how intensely the elevator shakes when travelling.
The following 2 variables control how much the elevator shakes at certain times:
- Shake When Travel Begins
- Shake When Travel Ends
- Shake Low Threshold: The shake value below which the effect is ignored. A high value can cause the shaking to be shorter and stop abruptly.
Here you will find some options that add a touch of realism (or fear, depending on the intensity) to the travel experience:
- Light Flickering: How often the elevator lights flicker. Possible values are:
- No flickering
- Almost Unnoticeable
- Annoying
- Heavy
- Nightmare
For reference, in "almost unnoticeable" mode the flashing occurs after a random time between 3 and 6 seconds (a lot) and in each flash the light stays off for a random time between 0.05 and 0.1 seconds (very little).
On the other extreme, in "nightmare" mode, the flashing occurs after a random time between 0.05 and 0.5 seconds (very little) and in each flash the light remains off for a random time between 0.1 and 1.5 seconds (quite a long time).
Intermediate modes handle intermediate values between these two.
- Elevator Shaking: With nearly identical options to the previous variable, this controls how often and how intensely the elevator shakes when travelling.
The following 2 variables control how much the elevator shakes at certain times:
- Shake When Travel Begins
- Shake When Travel Ends
- Shake Low Threshold: The shake value below which the effect is ignored. A high value can cause the shaking to be shorter and stop abruptly.
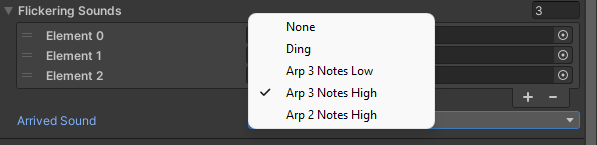 - Arrived Sound: The sound the elevator makes before opening its doors.
a. "Speed" section:
- Units Per Second: It is the normal speed of the elevator, expressed in meters per second.
- Slow Down Near Arriving: If this option is activated, the elevator will progressively decrease its speed when it is less than 1 meter from its destination.
- Slowing Down Effect: The higher this value, the greater the braking effect described in the previous variable will be.
- Initial Stop: The initial position of the elevator. The value of this variable is of type Transform and must be one of the children of "Stops". Stops is the only child of the "elevator brain" and contains each of the positions in which the elevator can stop.
b. "Avoid player bouncing while traveling" section:
- Avoid bouncing:
With both Rigidbody controllers and Character Controller controllers, the player typically tends to bounce or shake when a platform they are standing on moves vertically. This functionality recognizes when the player has entered the elevator and makes it a child of the elevator, forcing the player to move fluidly along with the elevator (and not as a result of physics), avoiding the ricochet effect.
- Player: A reference to the main player. If left unassigned, it will try to search for the player automatically by their "Player" tag.
c. "Details" section:
- Delay Start Moving: When the doors close, the elevator does not start moving immediately. This variable indicates the time between the total closing of the doors and the beginning of the movement.
- Delay Opening Doors: The time between the stop of the elevator and the opening of the doors.
- Wait Time Between Stops: How long the elevator holds with open doors before closing them and continuing the journey.
- Debug Mode: If you activate this option you will see in the console messages about the behavior of the elevator. Useful if you want to modify the code.
d. "Not everything is pink" section:
Here you will find some options that add a touch of realism (or fear, depending on the intensity) to the travel experience:
- Light Flickering: How often the elevator lights flicker. Possible values are:
- No flickering
- Almost Unnoticeable
- Annoying
- Heavy
- Nightmare
For reference, in "almost unnoticeable" mode the flashing occurs after a random time between 3 and 6 seconds (a lot) and in each flash the light stays off for a random time between 0.05 and 0.1 seconds (very little).
On the other extreme, in "nightmare" mode, the flashing occurs after a random time between 0.05 and 0.5 seconds (very little) and in each flash the light remains off for a random time between 0.1 and 1.5 seconds (quite a long time).
Intermediate modes handle intermediate values between these two.
- Elevator Shaking: With nearly identical options to the previous variable, this controls how often and how intensely the elevator shakes when travelling.
The following 2 variables control how much the elevator shakes at certain times:
- Shake When Travel Begins
- Shake When Travel Ends
- Shake Low Threshold: The shake value below which the effect is ignored. A high value can cause the shaking to be shorter and stop abruptly.
e. Others
The other "Elevator Brain" variables are assigned by the builder at creation time. They are for internal use, and should be left untouched. Of these, the only one that can add value to the user is:
- Arrived Sound: The sound the elevator makes before opening its doors.
 CREDITS AND CONTACT
If you have any issue using this asset, you can contact us:
Programming and sounds: Damián González · info@pipasjourney.com
3D Models and textures: Martín Fernández · zeonpav@gmail.com
Back to assets catalog