In previous page you have my contact information, so if you have any problem with this asset let me know, I'll help you.
______________________________________
IMPORTANT!
1. Before continuing, please notice that I'm implementing an online live documentation here: http://www.pipasjourney.com/damianGonzalez/counter/
There, documentation may have been edited, may have more details or small corrections. If you have any concern, it could be already answered or solved there. So I recommend following that link instead of reading this document.
2. This documentation is huge, but not because the asset was complicated to implement (in fact, it's as easy as it could be), but because the asset has many things you can configure, and I detailed everything. So, I'd recommend: Go straight to C (How to use). You'll see that just by dragging a prefab into the scene you'll be ready to go. And only come here if you don't get something. The inspector is user-friendly, you can figure out things by yourself.
__________________________________________
CONTENTS OF THIS DOCUMENTATION
A. OVERVIEW (same as in this asset's page in Unity Asset Store)
B. REQUIREMENTS
C. HOW TO USE (new)
D. VARIABLES IN THE INSPECTOR (Animated Counter)
E. VARIABLES IN CAMERA SHAKE
F. PUBLIC METHODS AND VARIABLES
G. DEMO & EXTRA CONTENT
H. LINKS
I. CONTACT INFO
__________________________________________
A. OVERVIEW
Animated UI Counter gives you a simple-to-use but versatile UI counter, that you can use for keeping score, lives, coins, bullets, deaths... whatever you want to keep track of and show to players in the UI. As it's an UI element, it can be used for any kind of video games.
Animated UI Counter basically do 3 things:
- manages the UI counter (a number in the canvas)
- instantiates floating texts (like +1, -1, or custom text)
- camera shakes
UI COUNTER:
Basically, it's a number in the canvas that updates to reflect a variable, and it's animated: it flashes when it changes its value, suddenly changing its color and size, and then slowly going back to the original ones.
You can configure all this in the inspector: Normal color and size, what happens when the value increases (what color it flashes, how much the font size inscreases, the speed of the flash), what happens when value decreases...
And you can also configure a "special zone": For example a danger zone when player's go low on health, or has few bullets, so you can set a special color, size, speed, etc.
FLOATING TEXTS:
If you want, this asset can instantiate an animated number or text on any position in the world, like "+1" when you pick a coin, or "-10" when an enemy loses 10 points of health. You can just specify "where" and leave the text to the script, it will automatically write "+1" or "-1" according to the difference with the previous value.
You can set the colors when going up, a color for going down, how much and how fast the text goes up, how much and how fast the color goes transparent, how much it decreases the size.
CAMERA SHAKE:
You can configure camera shakes for different moments: For example: whenever the count goes down, or up, or when it goes below/above a number, and how big the shake is.
You can set as many of these rules as you want. For example (as shown in the video), a small shake every time values goes down (like every gun shot), and a big shake when goes up (like when you grab ammo).
And you can even set on which independent axes the camera will shake.
A single counter gives you all that. You can have as many counters as you want. In the 2D demo there's one for time (seconds), other for coins, other for lives.
__________________________________________
B. REQUIREMENTS
This asset requires Text Mesh Pro.
If you don't have it, Unity will offer you to automatically install it ("Import TMP Essentials").
If you don't have it and this doesn't happen, you should manually install the package yourself, from the Package Manager.
__________________________________________
C. HOW TO INSTALL AND USE
How to use:
If you prefer visual instructions, check the implementation example video.
1) Download and import this package
2) If you don't have one, create a Canvas
3) Inside the "prefabs" folder, grab one of the "dg_animatedCounter" prefabs and drag it inside the Canvas. You should be able to see the number in the Game view.
4) Now in your script add a reference to the counter you just dropped, like this:
public animatedCounterScript scoreCounter;
5) Now you have 2 options:
a) Once you've modified your local counter variable, update the text:
scoreCounter.setValue(currentScore);
b) If you don't have your own counter variable, you can rely on the counter's own count, like this:
scoreCounter.addValue(5);
5) Save. In the inspector, drag the "dg_animatedCounter" prefab to your script's reference.
Once installed, you can keep the count yourself in your own variable and just update the counter, like
counter.SetValue(myVariable);
or you can rely on the counter's own internal variables, like:
counter.AddValue(1);
...or, more advanced:
if (counter.GetValue() > 0) counter.AddValue(-1);
__________________________________________
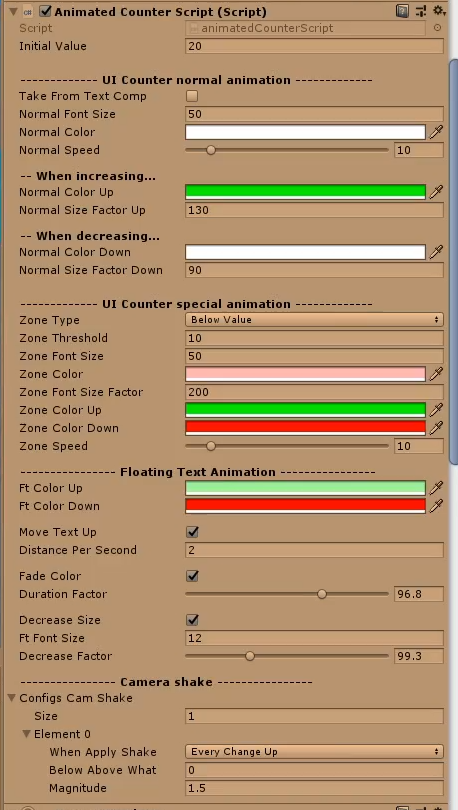
D. VARIABLES IN THE INSPECTOR (Animated Counter)
Initial value: The initial value of the counter, it will automatically set on Start method.
SECTION "UI COUNTER NORMAL ANIMATION"
Take From Text Comp (bool): If you check this, the script will automatically read the next 2 variables from the Text Mesh Pro component, ignoring whatver you've set here.
Normal Font Size (float): The normal size of the font (when the counter is not changing)
Normal Color (Color): The normal color of the font (when the counter is not changing)
Normal Speed (float): How fast will transition to these normal settings.
Normal Color Up: The flashing color when the new value is greater than the old one. Conventional values are green or white.
Normal Size Factor Up: Percentage to multiply the normal font size. If normal font size is 12 and this variable is 150, when increasing the value, font size will be 12 * 150% = 18, and slowly goes back to 12
Normal Color Down: The flashing color when the new value is less than the old one. Conventional values are red.
Normal Size Factor Down: Similar to Normal Size Factor Up
SECTION "UI COUNTER SPECIAL ANIMATION"
As said above, you can configure a "special zone": For example a danger zone when player's go low on health, or has few bullets, so you can set a special color, size, speed, etc.
Zone Type (enum) {None, Below value, Above value}: "None" will bypass this feature. "Below value", it will be "in the zone" when value is less than "zone threshold". "Above value": it will be "in the zone" when value is greater than "zone threshold".
Zone Threshold (float): See previous description.
Zone FontSize
Zone Color
Zone Font Size Factor
Zone Color Up
Zone Color Down
Zone Speed
All these variables are similar to the ones in "normal animation", but used for when the value is "in the zone"
SECTION "FLOATING TEXT ANIMATION"
Ft Color Up (Color): The initial color of the instantiated floating text when new value is greater than old value
Ft Color Down (Color): The initial color of the instantiated floating text when new value is less than old value
Move Text Up (bool): Whether or not you want the text to move vertically
Distance Per Second (float): How many units text goes up in one second. Negative number will cause text to go down.
Fade Color (bool): Whether or not you want the floating text to fade to transparent
Duration Factor (float): How slow floating text will fade to transparent. 99 means really slow (each frame the alpha value of its color will be multiplied by .99f)
Decrease size (bool): Whether or not you want the floating text to reduce it size
Ft Font Size: Initial font size of floating text
Decrease Factor: How slow text will decrease it size. 99 means really slow (each frame the size will be multiplied by .99f)
SECTION "CAMERA SHAKE"
Size: How many different settings for camera shakes
For each one:
When Apply Shake (enum)
- Never: Won't shake the camera
- Every Change: Will shake the camera each time the value changes
- Every Change Up: Will shake the camera each time the value increases
- Every Change Down: : Will shake the camera each time the value decreases
- Below: Will shake the camera each time the value changes below a value (next variable)
- Above: Will shake the camera each time the value changes above a value (next variable)
BelowAboveWhat (float): See "below" and "above" in previous variable
magnitude (float): How strong the shake will be. As a reference: I consider .3 is a little shake, .8 a medium one, and 1.5 a big one.
__________________________________________
E. VARIABLES IN dg_cameraShake:
- Axes to shake:
- Shake_x (bool): Whether the X axis of camera should be affected by the shake
- Shake_y (bool): Whether the Y axis of camera should be affected by the shake
- Shake_z (bool): Whether the Z axis of camera should be affected by the shake
- Duration: This number represents how much (/100) the magnitude of the shake will be multiplied by, in each frame. For example, Duration 99 means that each frame the magnitude will be multiplied by .99, producing a long shake. Duration 80 means that each frame the magnitude will be multiplied by 0.8, producing a short shake.
- Managed Externally (bool): If true, the script won't apply any rotation by itself. In other words, the Update() method won't call the public ApplyShake() method, so other script can execute it when it's convenient. This is useful when other script (besides cameraShake) rotates the camera, to avoid both scripts attempting to rotate the camera on the same frames.
In this case, the conflict happens:
- in 2D, between cameraFollow and Camera Shake
- in 3D, between the First Person Controller and Camera Shake.
Both scripts try to rotate the camera at the same time. So, the other script can call the public ApplyShake() method right after its own rotations are made, before rendering, so the second rotations (the shake) will be applied on top to first ones, resulting on very smooth shakes.
__________________________________________
F. PUBLIC METHODS AND VARIABLES
Public methods you can call:
- SetValue (int newValue, Transform origin = null, string floatingText = "", bool withUIAnimation = true)
- newValue: the new value to be set
- origin: if omitted or null, no floating text will be instantiated. If not null (a transform), a floating text will be intantiated in origin's position
- floatingText: if omitted or blank, text will be automatically generated from the difference between newValue and the current value. A string like "+1", "-1", or "+10" will be generated. If a string is specified, that will be used
- withAnimation: if true (by default), it will animate itself with the color and size you've set
if false, it won't animate, it will stay on the default color and size
- AddValue (int newValue, Transform origin = null, string floatingText = "", bool withUIAnimation = true)
same as SetValue, but with the addition of current value to newValue
- GetValue()
returns the current value
- forceAnimation(float simulatedValue)
forces the animation of the UI text, without changing the value. A "simulatedValue" must be passed, different than the current value, in order to tell which "direction" the animation should be player (as if it's greater or less than the current value)
__________________________________________
G. DEMO & EXTRA CONTENT
This package contains 2 ready-to-play demo scenes, one in 2.5D (works like 2D), and another in 3D in first person
This asset includes a few scripts used in the demo, like:
- First Person Controller (used in 3D demo)
- Camera Follow (used in 2D demo)
__________________________________________
If you need my assistance regarding this asset, feel free to contact me. Just be patient if I don't answer right away, give me 24hs before you feel abandoned :)
Contact info in previous page
 Initial value: The initial value of the counter, it will automatically set on Start method.